| Back | Home | Index | On |
There is a fair bit of controversy about the best way to make connections on an electrical system. Obviously some form of terminal is required in many cases, but in the case of "choc block" connectors and busbars the bare conductor is inserted into a hole in a brass block and a screw/screws are tightened down upon it.
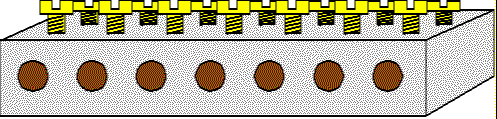
Connecting to Busbars and "Choc Block" connectors
| This photo shows a strip of "choc block" connector. The outer body is whitish plastic. |
The stripped ends of cables are inserted into the holes (from above & below
the picture), and the screws tightened up to fix it tightly into the brass insert. The
screw should spread the strands, forcing them against the bottom and sides of the brass
"tube" for maximum contact. DO NOT USE ON MAINS – There are too many gaps
for the high voltage to escape because of damp.
 |
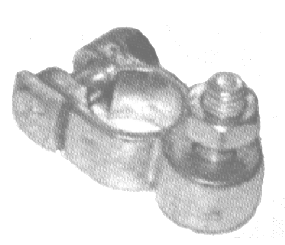
Here is a tinned brass busbar. Again the bare ends of conductors
are pushed into the holes and the screws tightened. Depending on design, there may only be one row of fixing screws. |
To solder or not to solder
Some people advocate soldering the ends of the conductors before they are pushed into the block. This may well be satisfactory IF:
Unless you are skilled, the above cannot be assured, so its probably best to use the correct sized hole for the cable where possible.
Some people advocate using pin terminals on the end of the wire and securing the pin in the connector. All this will do is:
Fixing
Once again to solder or not to solder is open to question. A few years ago one of the major German luxury car manufacturers banned its service staff from crimping terminals – it was leading to too many problems.
Apart from the problem of solder being drawn down the cable, inside the insulation, leading to fracture failures because its become a single strand conductor, there is also the real possibility of making a bad (dry) solder joint, which will again lead to unreliability and failure.
The best advice is probably to say crimp unless you are experienced at soldering and make sure you get a decent pair of crimpers!
Terminal types
The basic crimp types are shown below.
 |
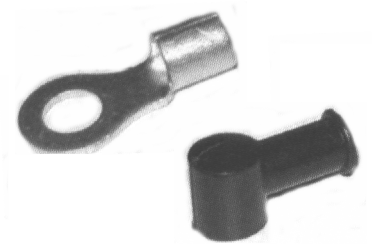
Crimp terminals are made in two parts, the plastic insulation, and
the inner metal terminal. They are pre-assembled during manufacture and good quality ones
may contain another thin copper, inner sleeve. This diagram shows the complete eye terminal, plus the exploded view of the parts. Note that the metal tube only fits about half way down the insulator. |
| The Male Blade terminal
A Fully insulated female blade terminal. This and the male blade can be used to join two lengths of cable. There is also a version without the full insulation.
Male and female bullet connectors - again may be used to join two pieces of cable. Always make sure that the female part is on the positive side of the junction.
A butt joint crimp connector for making non-breakable cable joints. |
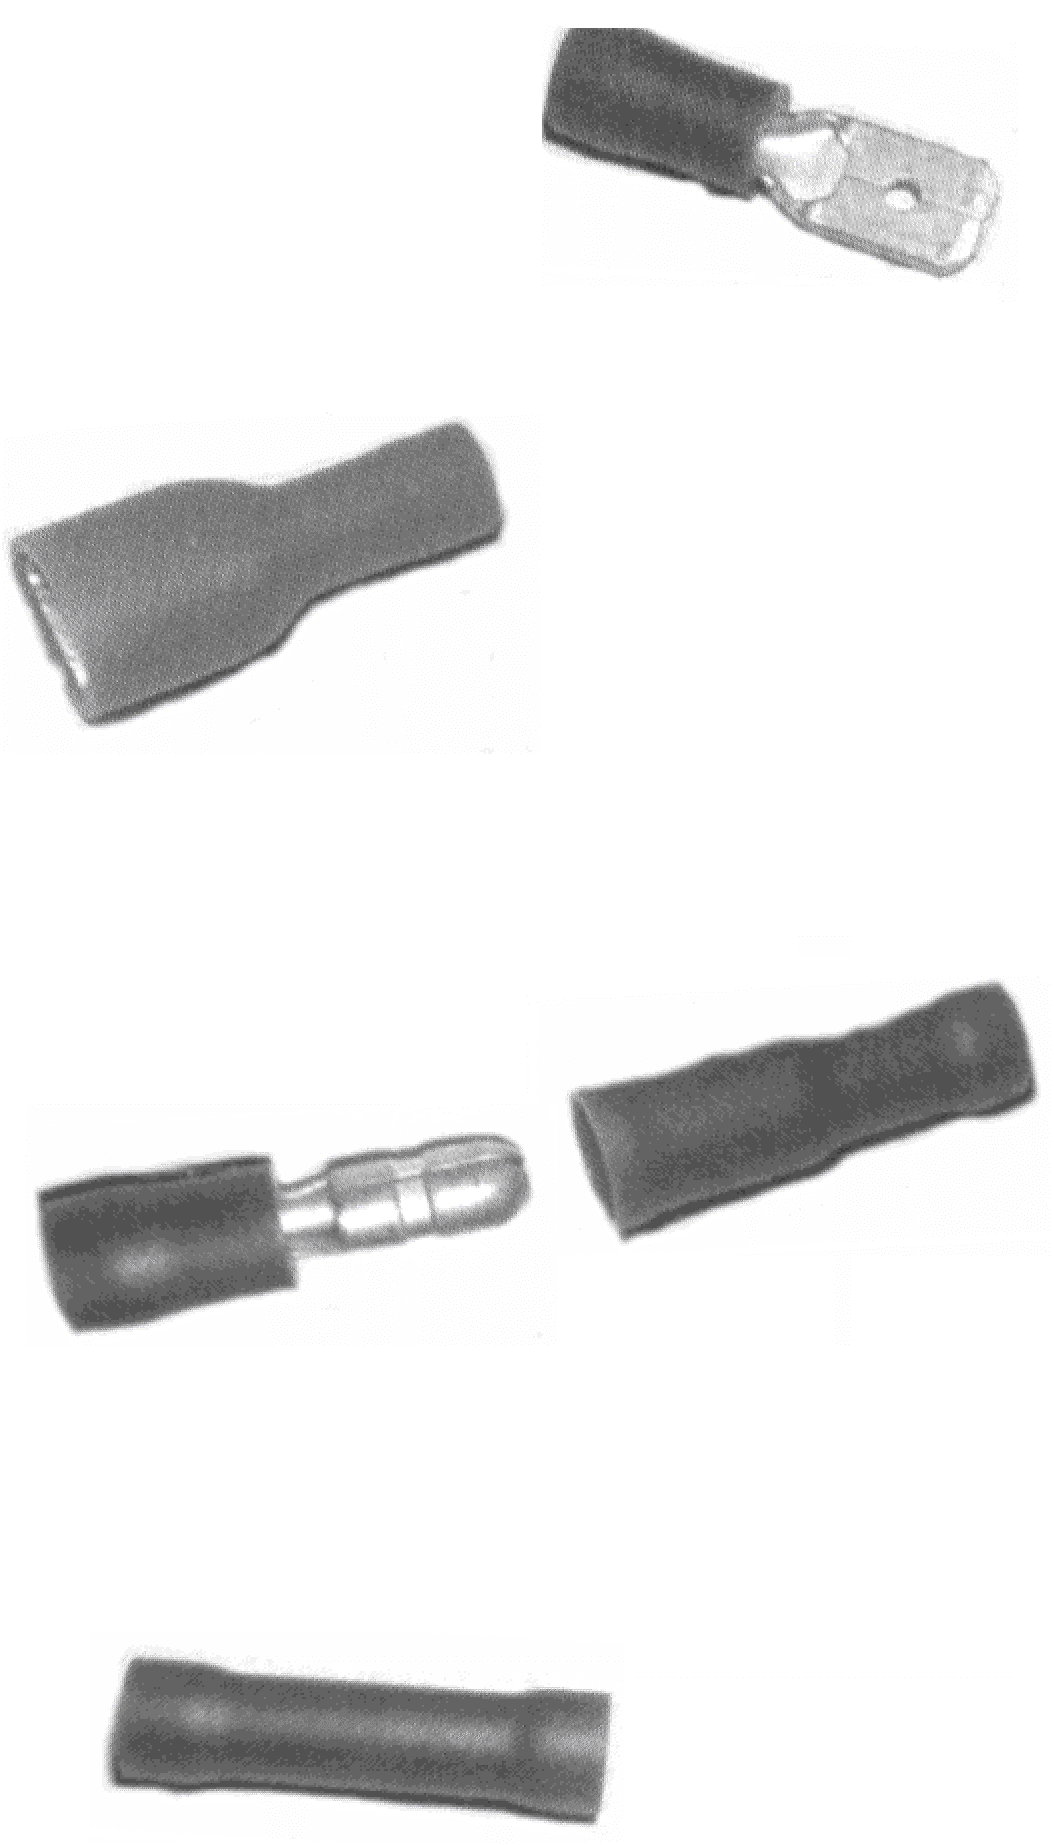 |
All these crimp terminals come in one of three colour coded sizes. Each covering a range of conductor diameters:
Red Insulation - 0.65 mm2 to 1.5 mm2
Blue Insulation - 1.5 mm2 to 2.5 mm2
Yellow Insulation - 3mm2 to 6m2
Any larger cable will need a different type of terminal.
To make a good crimp connection
You need a crimping tool that looks like a glorified "Mole Wrench".
This diagram illustrates the length of stripped wire required.
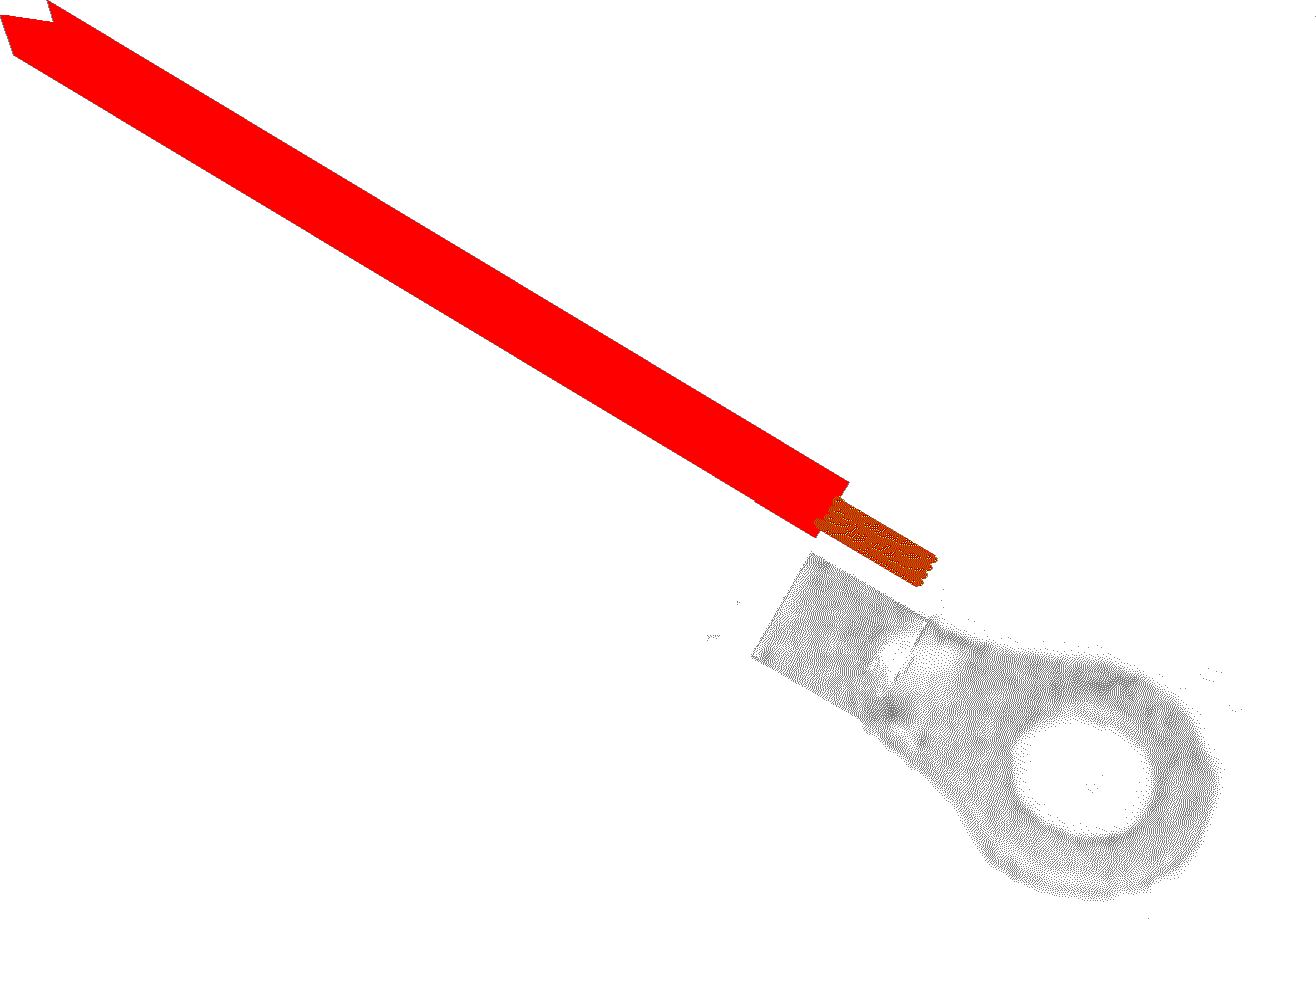

Note the two crimp marks.
This type of crimp connector is also available with an insulating sleeve that is made from an adhesive, heat shrink material.
They are more expensive, but if you use these, after crimping you apply heat to the insulation. This causes it to shrink down onto the cable and also melts the glue that coats the inside. When it cools the terminal is crimped, shrunk, and glued to the cable. This minimises the risk of damp getting between the cable insulation and conductor and causing corrosion.
If using non-tinned, auto type cables for sea use; the heat shrink, adhesive crimp terminals are probably the better option.
The last item does not mean very hot soldering irons, it means a large copper iron (say ½ pound minimum), heated on the gas so that when its held about four inches from your cheek you can feel the heat.
Make sure everything is clean and corrosion free. Do not use any form of acid or active flux because it will get between the conductor and insulation and cause corrosion – use resin flux, specifically multi-core solder.
Heat the iron and file its end to bright metal, swiftly applying solder.
If the solder forms blobs dip the tip of the iron into acid or active flux (from a plumber’s merchant) and reapply solder.
Continue until the tip of the iron has a silvery grey coating on it. This is known as "tinning the iron".
Return iron to heat.
The smaller terminals should have two metal crimping points on it, one for the conductor and one for the insulator – only crimp the conductor one.
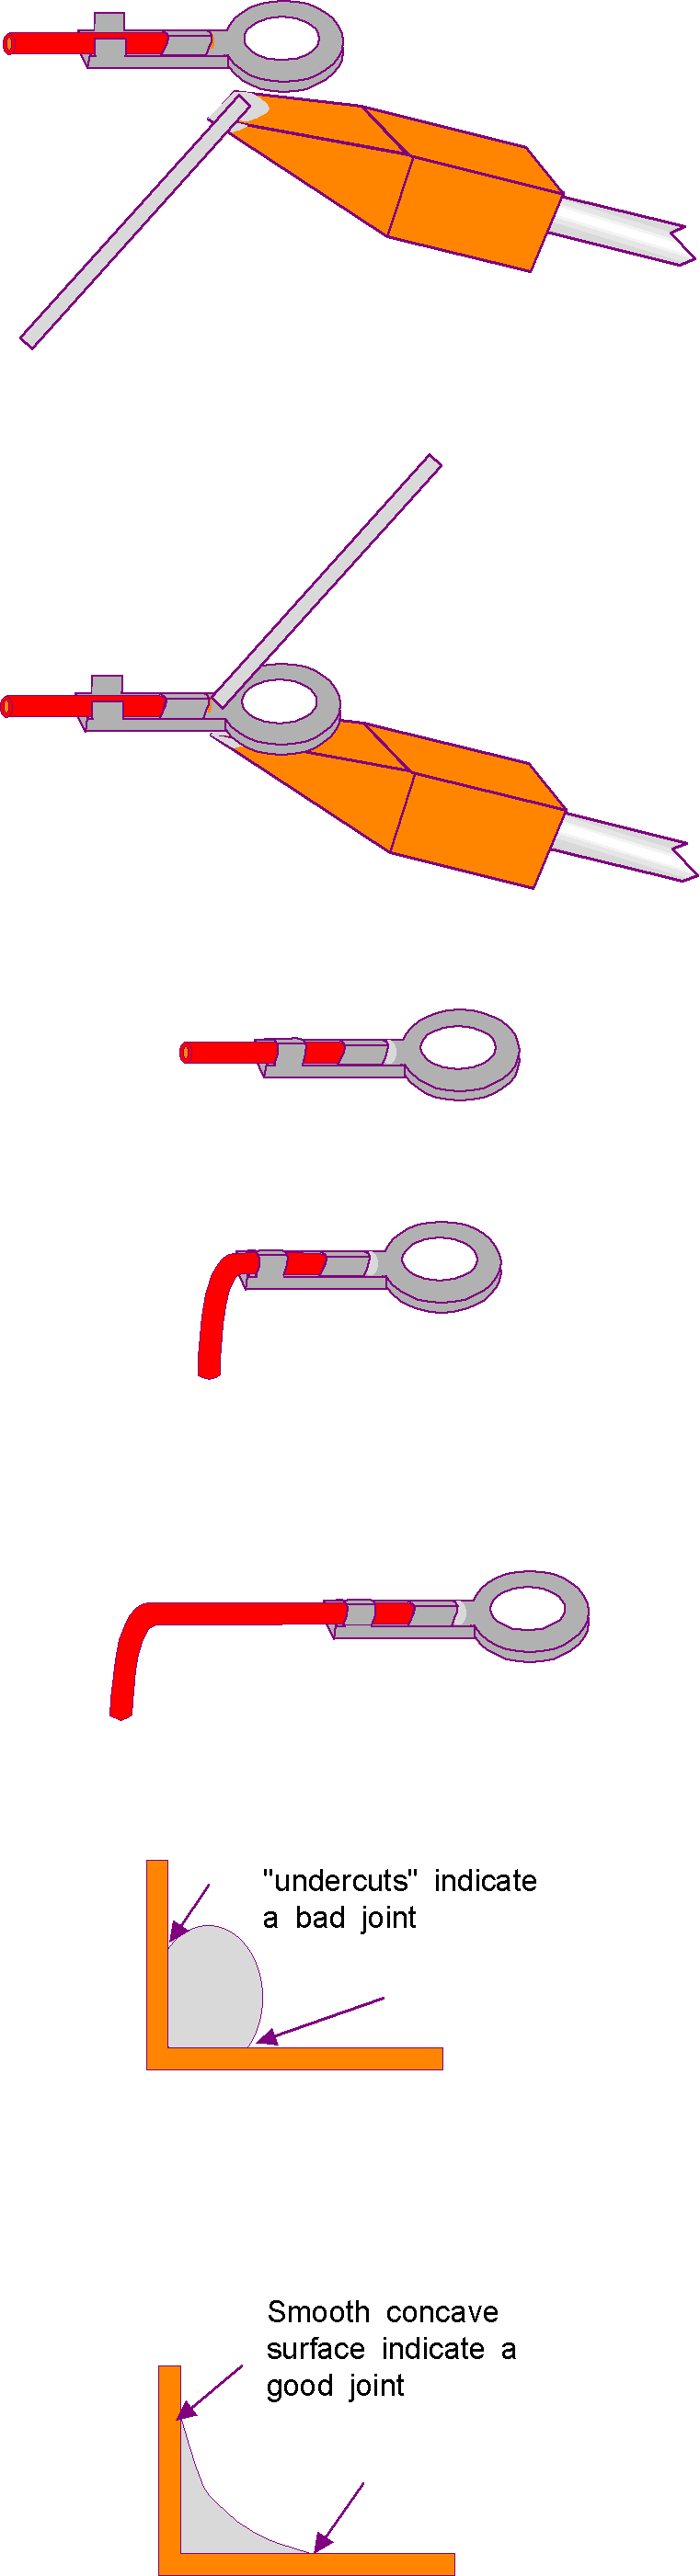 |
Hold terminal just above the hot iron with the multi-core solder
between the terminal and iron. Push terminal down onto iron. The solder will melt and the flux inside it will make a good heat path between the iron and terminal. Holding the terminal (by the cable, a few inches back) firmly onto the iron and start dabbing the solder onto the end of the conductor/terminal joint. A soon as the solder melts and runs into the joint remove from iron & remove solder. Allow to cool, and crimp the insulation. To test, bend the conductor at 90 degrees to terminal. If it bends right at the terminal no solder has run down the conductor. This is good. If it bends some way from the terminal you have soldered the conductor strands into a solid. This makes it subject to vibration failure, so you need more practice! Carefully inspect how the solder has flowed onto the terminal and the conductor. If it forms undercuts as shown here either the joint was too cold, or the parts were dirty. If the solder has flowed to form a smooth concave surface you probably have a good joint. |
If you do decide to solder for anything other than an emergency, practice, practice and more practice. A bad solder joint can be difficult to detect and on high current applications can result in heat and a possible fire.
When soldering blade terminals make sure that you position everything so gravity pulls the solder down into the joint, rather than allowing it to flow over the blade or to clog the female receptacle.
T Junctions in cables
There is some controversy about the best way to T into a cable run, take your choice from:
These are probably OK for inland use, especially if you are using tinned
conductors.
PROVIDING I COULD GET ADHESIVE HEAT SHRINK OVER THE JOINT this is the method I think I would use, however only do this if you are confident in your soldering ability. The higher the current flow the more important the quality of the joint.
The type of terminal used for large charging, inverter and starting circuits require a much larger crimping tool. These are a similar shape and size to tree loppers and they cost about £90 and make a single, large indentation to crimp onto the conductor only. Insulated covers should then be used.
For simplicity buy your heavy-duty cables already made up.
If you have no access to ready made cables then I am afraid soldering is the only way, except this time you need a blowlamp.
Whatever method you choose, you are likely to run solder down the cable.
Always choose a terminal that is a push fit over the conductor, so less solder is needed to fill the voids in the joint.
Ensure the joint is very clean and smear RESIN FLUX onto the ends of the conductor and around the inside of the terminal.
Use the thickest resin core solder you can find (plumbers’ merchants often have thick stuff).
The rest of the method is illustrated on the next page.
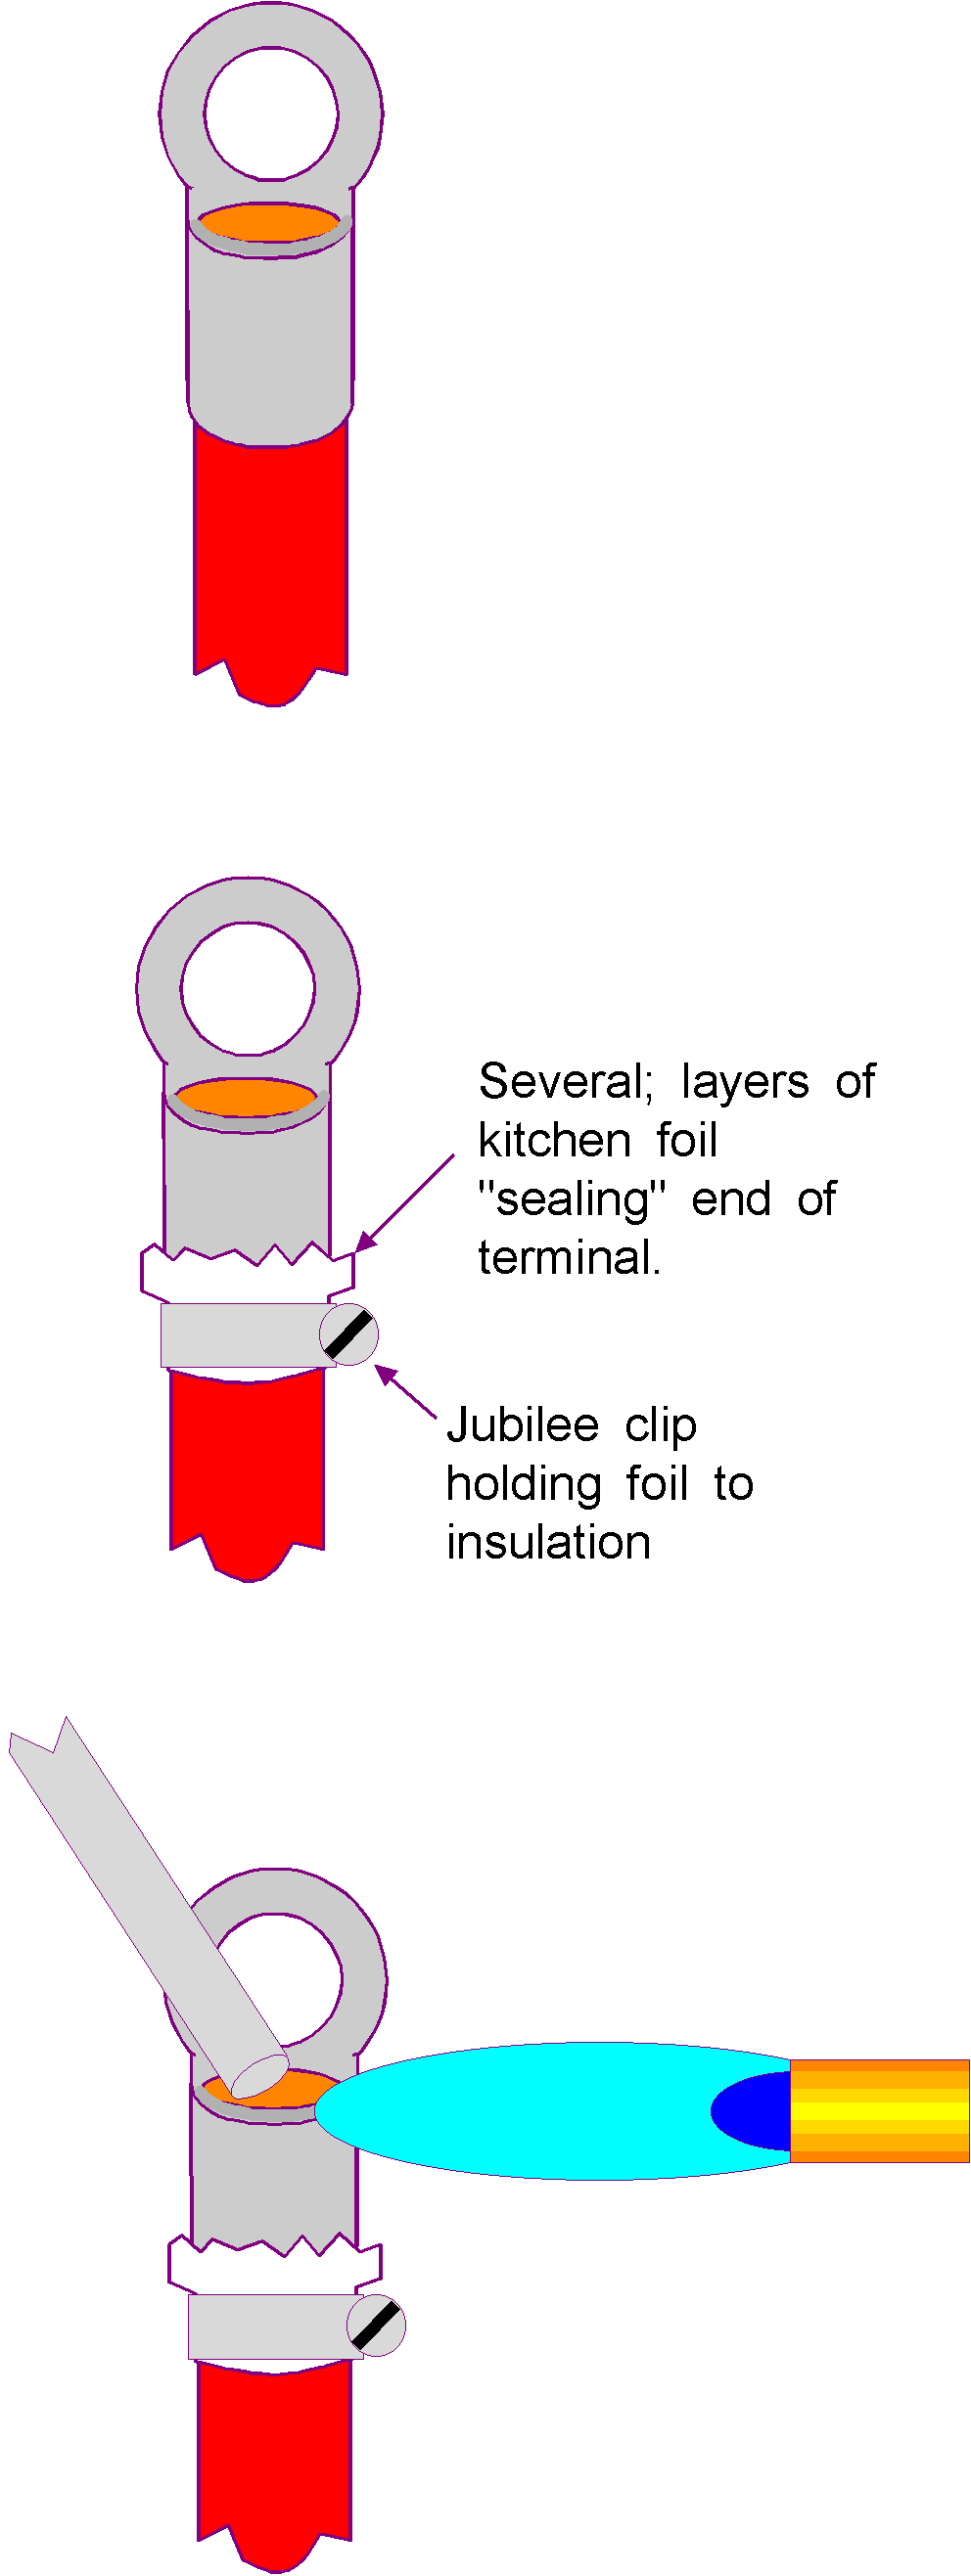 |
Strip end of cable so the conductor just reaches the end of the
"tube" on the terminal. Smear conductor and inside of terminal with resin flux. Push terminal onto cable so the insulation is butting against end of the "tube". If the terminal is split, crimp as tightly as you can, use gland nut pliers or something. Wrap several layers of kitchen foil around the joint between the cable and terminal and secure with a jubilee clip. This acts as a seal to stop solder flowing from the joint and also acts as a heat sink of sorts.
Grip the cable, tight under hose clip, in a vice, or a mole wrench. Apply the torch to the upper portion of the terminal and the solder. Run the solder into the joint. Be very quick, and try to stop as soon as it looks as if all the cable strands have been covered in solder. |
| When the joint is cool remove the foil and jubilee clip and inspect joint. Fit the insulating cover or heat shrink tubing. |
 |
HEAT SHRINK TUBING
Heat shrink tubing is a special plastic tube that contracts to about 1/3 of its original diameter when subject to moderate heat. I find a match of flame type gas lighter the easiest to use.
This can be placed over both the terminal and cable and shrunk so it forms a tight, insulating and re-enforcing cover to the joint.
For particular damp/salty/harsh environments heat shrink is available with an internal adhesive.
 |
The Boat Safety Scheme bans (for very good reasons) battery terminals that are secured to the conductor by a couple of screws. It is hard to make a good solder joint to a battery terminal – especially when away from a workshop – so I would advise that you use the type where the battery cable is terminated in a heavy eye terminal. A nut and spring/star washer then secures the eye terminal to the battery terminal. |
Always ensure the lead battery post has not gone black – if it has scrape the corrosion off.
Always check battery terminals are secure and tight.
Always coat the battery post and all terminal surfaces with petroleum jelly or special battery terminal jelly – it prevents acid fumes causing corrosion.
REPAIRING LOOSE LARGE TERMINAL CRIMPS
It is not unknown for the terminal at the starter motor end of a main battery cable to become loose over time. The cable being too short probably causes this, so allowing engine movement keeps pulling at the joint.
When this happens the symptoms are often random occurrences of having an apparent flat battery. Sometimes the engine starts and at other times it just gives out clicks.
Voltdrop tests (see later in the book) will identify the loose connection, but once its found, it has to be rectified so the engine starts.
Having pulled the rubber insulation clear or cut away the heart shrink tubing one usually finds the joint is covered in oil/diesel/bilge water, so will be very difficult to solder.
Proceed as follows.
If you can pull the terminal off, do so then:
Splay the conductors and wash them and the terminal with white spirit or other suitable solvent.
Rub the strands and the inside of the terminal with glass paper to try to get back to bright metal.
At this point you will probably find that you cannot get the joint clean enough!
Push the cable back into the terminal and proceed as below.
If the terminal cannot be removed from the cable, wash as much as possible in white spirit and then re-wash with detergent and rinse & dry.
Then:-
Heat terminal and cable and dip into a tub of plumbers Active Flux. (This is the only time you should use such stuff on wiring because of the corrosion it can cause further down the cable, but the cable is faulty anyway, so shortening a very long life is not a major problem – especially if you replace it as soon as convenient!)
Repeat two or three times.
Finally solder as described in the large terminal section.
The life of such a joint, in my experience, is measured in years.