| Back | Home | Index | On |
SELECTING THE CORRECT SIZED CABLE
First understand that cables that are too large cannot, and will not cause any problems – they might cost you more, but they will do no harm.
Advantages of oversized cables
Minimum volt-drop.
Less overheating under fault conditions
Circuit can be added to without up-rating cables (as long as they are still large enough).
Less likelihood of overheating because of "bundling".
Simplifies ordering (whole drums of cable can do lots of different circuits)
Disadvantages of oversized cables
More costly
Can be more difficult to run/hide.
Cable types
The Boat Safety Scheme and good practice requires the use of multi-strand cables.
These are sized by a two-part number showing:
So a piece of cable sized 28/0.30 has 28 strands, each strand being 0.30mm in diameter.
You should also be given the cross sectional area of the conductor (all the strands together) and the maximum current rating for the cable (un-loomed/un-bundled)
Ideally each strand should be tinned to minimise corrosion as damp is drawn down between wire & insulation. However inland boats can "get away" with non-tinned cable.
Boats built under/to the Recreational Craft Directive are required to have cables with a minimum number of strands, other boats are not required to adhere to this standard. This only applies to the thinnest cables, so choosing a slightly thicker one avoids this.
Most easily available cables have PVC insulation. This has a relatively low resistance to heat, and as electricity flowing through a cable causes heat the current flow has to be "de-rated" if the cable is tightly bundled/"loomed up" with other cables so the heat cannot escape so well. If you over-specify your cables you will minimise this problem. In most cases the Volt-drop calculation (see later) will ensure this is not a problem.
There are other insulation materials that allow a higher working temperature (Tri-rated cables, silicone rubber etc) that also minimise any potential problem.
VOLTDROP ON LONG CABLE RUNS
Any cable has some resistance to current flow. The resistance turns some of the voltage to heat so the longer the cable the more voltage is lost to heat.
Ideally the maximum voltdrop on a cable run should be about 0.3 volts, however in most general applications 0.5 volt should have no marked effect.
Take particular care to minimise voltdrop on:-
High current devices
Electric compressor fridges
Inverters
Macerators & pumps.
For runs of much over 2 or 3 metres ignore any current capacity marked on a drum or in a table/catalogue apart from taking it as a maximum – CALCULATE THE VOLTDROP.
Method 1 – a formula

Current = amps
Length = out AND back length in metres
Area = cross section area of the conductor
Example
A tunnel light on a 16.5m boat uses a 55-watt bulb – what size conductor is needed?

This means that the lamp would only receive 10.8 volts, so it would be a bit dim – but probably not to any noticeable extent.
44/0.30 (3mm2 ) gives a voltdrop of 0.8 volt
65/0.30 (4.5 mm2 ) gives a voltdrop of 0.5 volts
As tunnel lights are only on for a relatively short period, there is no regulation governing them, and 55 watts is far too bright for oncoming boaters anyway, 28/0.30 would do the job.
If it was a yacht’s mast head lamp one would have to take a less cavalier approach to cable sizing because of international regulations regarding the boat’s statutory lights.
Method 2 – use of a table (supplied by cable merchant).
One can also look up the voltdrop per amp per meter on a table and do a simple multiplication.
Size |
Area mm2 (Conductor) |
Current rating |
Voltdrop per Amp per Metre |
Vehicle type PVC cable |
|||
14/0.30 |
1 |
8.75 |
0.0189 |
28/0.30 |
2 |
17.5 |
0.0094 |
44/0.30 |
3 |
27.5 |
0.0062 |
65/0.30 |
4.5 |
35 |
0.0041 |
Tri-rated cable |
|||
32/0.20 |
1 |
18 |
0.0189 |
50/0.25 |
2.5 |
31 |
0.0075 |
56/0.30 |
4 |
41 |
0.0047 |
NOTE = 14/0.30 does not comply with CE regulations.
So the calculation for the tunnel light with 28/0.30 cable becomes:
0.0094 X 4.6 X 32 = 1.4 volts
The difference is due to rounding errors when compiling the table, but note the errors lead you to specify thicker cable.
Once you have done a few key calculations you will find that you know what size of cable needs to be used.
If a supplier tells you what size cable to use, or if they give a different way of working it out – USE THEIR INFORMATION
For instance Shoreline say use 1 mm2 cable for each metre of run between battery and fridge. Use this sized cable for both the out and return run. They also say fuse at about 3 amps. The two figures just do not make sense unless you know a bit about the way compressor fridges start up and their "inbuilt protection circuits". Do not doubt the makers – they are trying to ensure you get a reliable product.
I suspect similar "rules" exist for inverters!
* Tip
When using vehicle grade PVC cables with 0.30 conductors, simply halve the number of strands to get a safe maximum current rating (this takes no account of voltdrop). This does not work for cables larger than 120/0.30
ALLOWING FOR FUTURE ADDITIONS
Most boats tend to be in a state of continuous "improvement", so if you fit over large cables in the first place, you can add some extra "branches" with simply a change of fuse or circuit breaker. This saves a lot of problems in trying to run a whole new circuit back to the battery or busbars.
You must keep a note of the cable size you have used, so you can ensure your additions do not overload the cable – fire is nasty stuff, especially when twinned with thick, black PVC smoke!
SELECTING THE CORRECT FUSE/CIRCUIT BREAKER
The fuses/circuit breakers are fitted to PROTECT THE CABLES. If a fault in a load or damage to the cables causes excess current flow, it is already too late for the load or that piece of cable, but you do not want the fault setting fire to the cable run.
Fuses
Fuses are not very accurate with their rating, so can blow at rather different loads than that stated.
The fuse wire does heat up and cool down during use, so, over a long period of time they blow because the wire has deteriorated due to the constant thermal stress.
The fuse wire must cause voltdrop.
They are usually cheap to replace and can be "jury rigged" on a "get you home" basis – once you understand the dangers of what you are doing.
Do not use the ceramic "pointy end" vehicle fuses. They always seem to develop poor contact at their ends.
Circuit Breakers
Should not cause significant voltdrop (they use magnetism/heat to operate).
Can be easily reset if they trip accidentally.
Should not deteriorate over time.
Circuit breakers (MCB = miniature circuit breaker) are probably the most satisfactory circuit protection method BUT:-
The correct selection of circuit breakers involves studying the tripping characteristic graph for each breaker, however for an amateur simply specify the breaker/fuse for the maximum current rating of the cable. You would have increased this by 20% for inductive loads, so this should be fine.
Actual specification
For simplicity this section covers both fuses and circuit breakers.
- From your specification of cable sizes you know the current rating.
- We have already said that if its not a filament lamp we will assume it is an inductive load.
It is unlikely that a fuse or circuit breaker will be available that exactly matches your load so:-
Select the next size fuse/circuit breaker above the capacity of the cabel if there is not an exact match.
If having done this you find something is constantly blowing/tripping the protection:
If it is higher than your calculation/label rating ensure the load is not faulty or something like a pressure switch is not set too high.
If it is as labelled/calculated it is likely that the protection device is reacting to a starting load too quickly.
Ensure you have not fitted a fast blow fuse.
Fit a slow blow fuse if available – same rating.
Fit the next size fuse up.
Choose a circuit breaker with slower reaction characteristics.
Fit the next size circuit breaker up.
Do not fit a device that has a larger capacity than the nominal cable capacity!!!.
The "what to fuse" on the domestic system is easy – you fuse every circuit.
How to fuse it is more difficult. Given unlimited finance and space, one could fit a fuse/circuit breaker box with one device per circuit, but in the real world this is often not practical.
You first have to think about what circuits can be combined onto one fuse, without overloading any part of the circuit or fuse/circuit breaker.
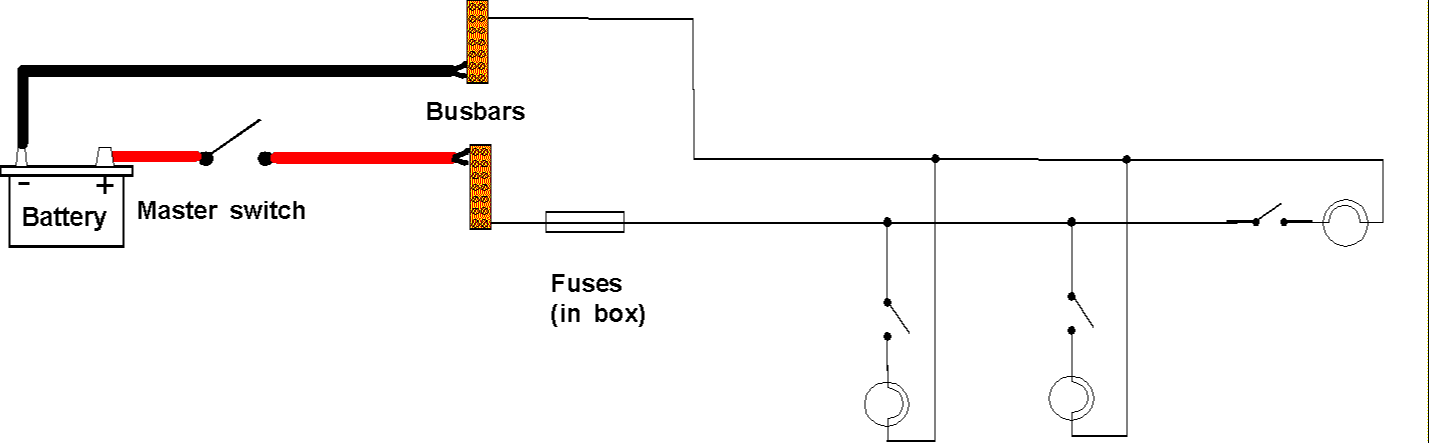
I would suggest that the final plan would look something like this:
The idea is to fuse very critical, high current things individually and combine low current or items that are unlikely to be used together.
The interior lights are split into port and starboard, so you always have some light to fault find by!
Ensure that the fuse/circuit breaker is rated no higher than the maximum cable rating.
Remember – its your boat and your time costs you nothing when you have it to spare, but costs you inconvenience when you do not, so when wiring your boat you should always be thinking of how your decisions will affect the ease of faultfinding/repair when things go wrong.
Some questions
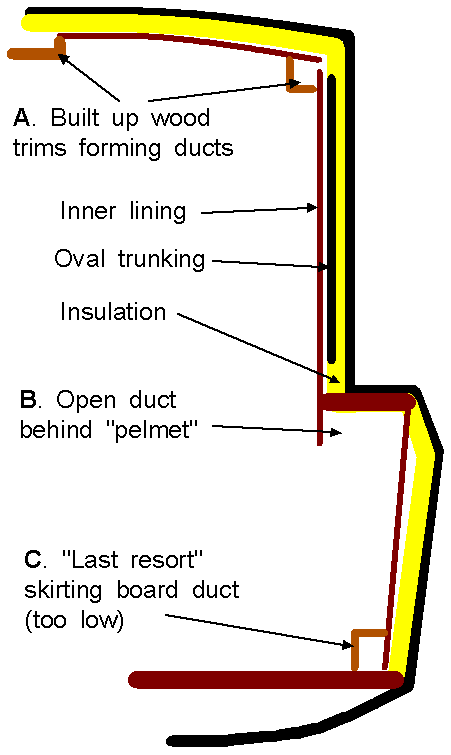
I overheard a boat builder at a show explaining to a potential customer that they built their boats like houses – First fixings then second fixings, with the wiring beneath the lot. This is a recipe for problems, you should be able to get at the wiring without major structural work. The diagram below suggests methods of running the domestic circuits that do allow access.
|
This diagram is a cross between a cruiser and narrow boat, but the
ideas of cable accommodation can be modified to suite any form of boat. If the thermal insulation is expanded polystyrene the cables must be separated from it in some way – its best to use another thermal insulator. This is why the run of oval trunking is shown, to separate the wiring running to a switch or socket from the insulation. Keep the wiring as high as possible to avoid water damage – this is why method C is a last resort method - Never run cables through the bilge space (except to bilge pumps and gas leak sensors). This may be the only sensible way to retro-fit electric fridge, bowthruster or inverter cables. |
If any cables are to be run behind fixed panels, then run them through trunking (available at DIY shops and electrical outlets).
Where a switch, socket, light etc is to be fitted through a fixed panel terminate the trunking with a suitable patress box (the thing you have behind your switches and sockets at home). Also fit patress boxes behind the mounting point for any ceiling lights – these will give you space to accommodate the "choc-block" connectors these lights often use to connect to the permanent wiring.
Only loom (bind up) cables in the engine room to help protect them from damage – use non-sticky PVC tape so they remain flexible – ordinary insulating tape sticks all the cables together and makes the loom stiff and difficult to bend.
Loosely bind cables with "zip ties" every few feet and support them every 300mm if they are not to be run in plastic/metal trunking. This makes the bundle easy to open if you ever get a cable burn out.
Always install extra cables through trunking, ensuring you fit more trunking if the wires are starting to be a tight fit. This will allow you to "pull through" any cables in the future, or even use the extra cable in future extensions (as long as its large enough).
Keep mains wiring at least 30mm away from the low voltage DC cables. If they have to be closer make sure at least one of them is in trunking. This is to minimise the risk of a fault putting mains voltage onto your DC circuits – with fatal results.
Keep electronic equipment (navigation equipment) separate from both the mains and DC circuits. Also only cross such circuits at right angles. This will ensure that any interference from pulsating magnetic fields is kept to a minimum.
In some way identify the ends of each cable & mark it on a list or diagram. Rubber or crimp letter/number bands are available or even a white insulation tape "flag" marked with permanent marker would do.
Selecting cable for the "commoned up" circuits
You can wire things like the lighting and 12 outlet circuits up individually and only join their conductors at the fuse & busbar as shown:

There is nothing wrong with this approach, but it will cost you money for all the wire and also time and space for running the cable.
An alternative is to "T" off a single cable of adequate size.
This method can also be used for 12v outlets, pumps, fans etc.
Just make sure the cable and fuse/circuit breaker is specified for the maximum foreseeable current flow.
IDEAL SECOND LINE FUSE
Ideally there will be a second, higher rated fuse/circuit breaker closer to the battery to protect the circuits if the "main fuse" failed to operate. There is often not.
Some circuit breaker boxes fit a master circuit breaker, or you could fit a
very large capacity fuse in the main + battery to busbar cable, close to the battery.