![]()
![]()
Home Index
On
|
||
| Back | Home Index |
On |
There are endless variations on the types shown here. One should relate what is fitted to your own boat and then use the relevant points below to understand it.
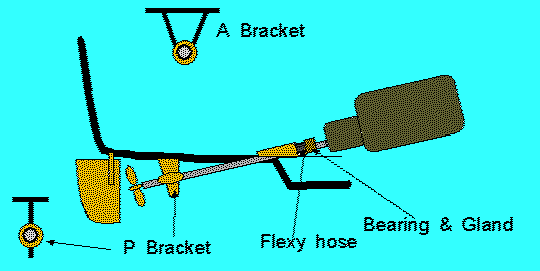
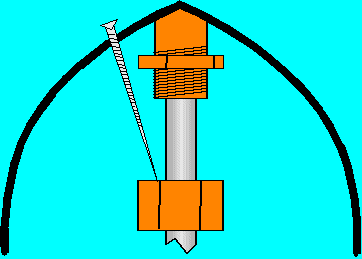
This type can just about get away without a flexible coupling because the hose joining the gland to the log, together with a rubber bearing in the P or A bracket allows the shaft to "shake" about without damage. This type is popular in GRP & plywood type hulls.
There are two big problems:-
If the engine "drops" the shaft will rub on the underside of the bronze shaft log just behind the gland & hose. Without attention this will wear the bronze away until water starts to leak in (poking about with your finger is also likely to get you a bad cut on the sharp warn edge of the hole in the log)!
The hose is all that keeps the water out. This leads to two more problems:
If the hose fails - you sink!
The gland/bearing assembly will try to spin with the shaft - especially if the gland has been over tightened - this is prevented by dogs (castellations) on the log and gland assembly interlocking. If someone has fitted a new piece of hose WITHOUT ensuring it is short enough to allow the dogs to engage, the hose will eventually be "wrung" apart by the shaft - again you sink!.
These comments apply to any stern gland with a hose joining it to the log.
Adjustable type
This type is similar to the above except the hose is replaced by a ball and socket joint sealed with O rings. Once the engine and shaft is aligned the ball joint is locked in place with a small bolt.
A dropped engine will still cause problems.
A bent or out of alignment shaft will cause the ball joint to continually move which inevitably wears the O rings and causes leaks. As long as the owner is vigilant about bilge water this type is unlikely to fail catastrophically (especially for inland use).
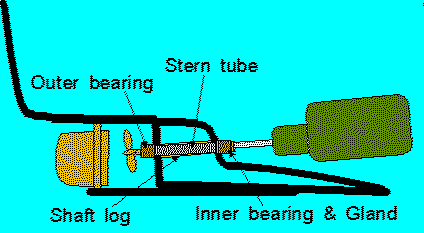
Used on GRP and steel boats where there is a keel or swim in which to mount the stern tube.
 The whole assembly consists of an inner bearing and gland assembly, an outer bearing
assembly screwed to each other or an intermediate tube. The inner and outer bearings are
then often screwed/bolted to the hull to stop them turning.
The whole assembly consists of an inner bearing and gland assembly, an outer bearing
assembly screwed to each other or an intermediate tube. The inner and outer bearings are
then often screwed/bolted to the hull to stop them turning.
There is virtually no flexibility in this type so a flexible shaft coupling should be used with a flexibly mounted engine.
The inner bearing is usually plain white metal or bronze, whilst the outer one may be a rubber "cutless" bearing, plain, nylon or tufnol types.
Sometimes this type is made flexible with a hose (see above).
 Conventional in Wooden Boat
The difference here is that the intermediate tube runs through an oversize hole drilled in the keel and a piece of wood, above the keel, known as the shaft log.
The inner and outer bearings are usually secured by bronze coach screws. As the boat "works" the joint between the bearing and keel/log starts to leak. To overcome this the hole should be packed with a "flexible" compound (traditionally white lead and grease).
Some ex-Broads boats have shaft logs fabricated from planks and filled with pitch/tar. This is fine until they are banged into something and the filling fractures - leaks can then ensue.
Somewhere along the top of the log there SHOULD be a metal plate either nailed or screwed on. Under this plate is a hole where a grease gun with its end removed can be applied to re-pack the log.
I have had to drill the hole myself, but take care not to drill through the stern tube.
I also used a self-made mixture of putty and grease, although alternatives that are more modern may be available.
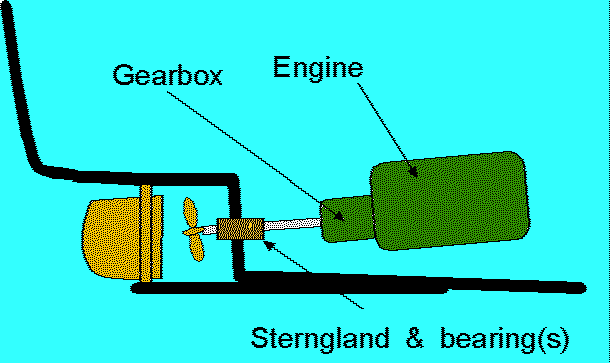
The conventional stern gland is usually part of the inboard shaft bearing assembly and its sole job is to keep the water out whilst allowing the shaft to turn. They fall into two main types:-
"PATENT" TYPES" These do not need packing, are supposed to last for "life". They often have a telltale bottle. There are a number of designs like Deep Sea Seals & Carbon ring seal. Your lecturer is not 100% convinced they will seal with a bent shaft.
OIL BOTTLE TELLTALES
Some modern, non-packed, stern glands have an oil bottle attached by a short hose. This is NOT FOR LUBRICATION - it is a telltale if the gland starts to leak. The leak shows up by either loss of oil or water appearing in the oil.
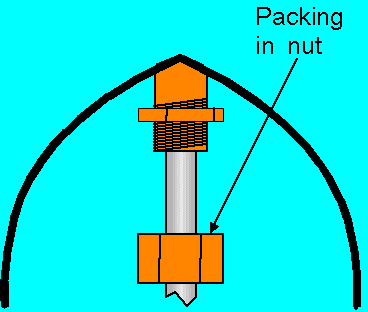
PACKED GLAND By far the majority of stern glands are like this, the shaft disappears through a large, long nut, or through a sleeve which is held in place by two nuts/bolts.
These glands have a "tacky" rope like material inside them which is squeezed up by the big nut or sleeve to stop leaks.
Packing Stern Glands
First of all you must recognise that there are many different types of non-packed stern glands being fitted today and if one of these is leaking you may well be faced with taking the boat out of the water and either pulling back or totally removing the propeller shaft. Some packed glands are associated with a "rubber hose" as part of the assembly, so the fact that there is "rubber" present cannot be taken as any of indication of gland type.
Typical views of the more common packed glands are shown below. Unfortunately I am still coming across slightly different designs, so for any individual boat you have to pick the features your gland has from all those shown. Although the plan (top) views are for a steel boat they may also be found on some displacement GRP hulls and possibly plywood ones as well. The differences will be in how they are fixed to the hull - welded, screwed onto a stern tube and bolted to the hull, screwed onto a stern tube and bolted to a plate, or bolted to the hull and glassed in. The greasers are not shown in order to simplify the diagrams.
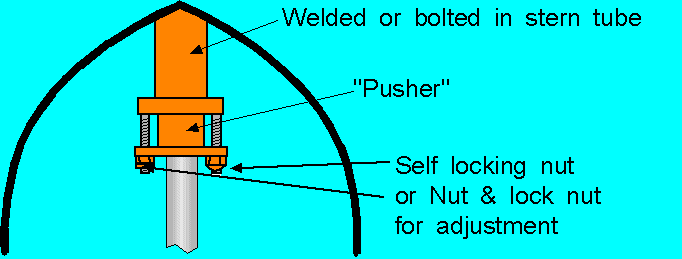
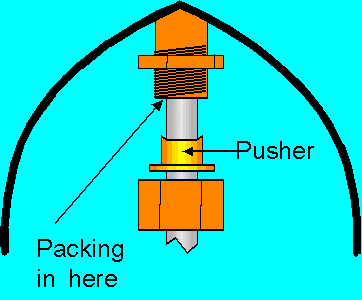
This is typical of many of the rigid glands as found on steel and GRP boats. The nuts push a "pusher against the gland packing.
Fig 1
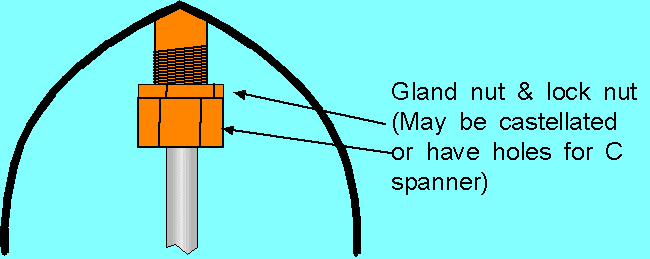
This is similar to the above, but the packing is either in the big nut, or the nut has a "pusher" inside it like a smaller version of the one above.
Fig 2
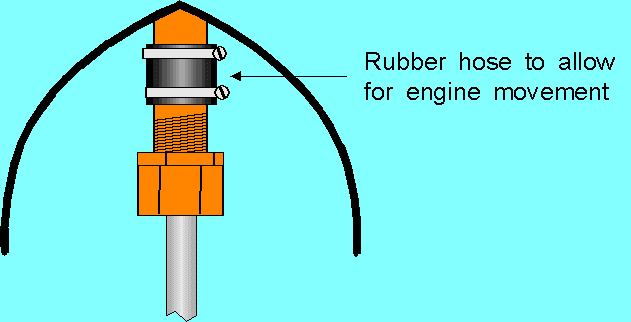
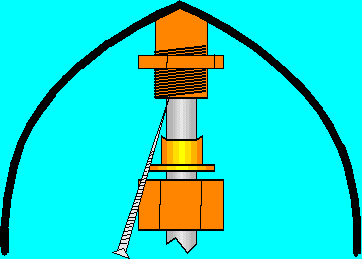
This flexible sterngland is most often found on GRP boats that support the back end of the shaft in a P or A bracket (diagram below), but it can be found on steel, wood and displacement GRP craft.
Fig 3
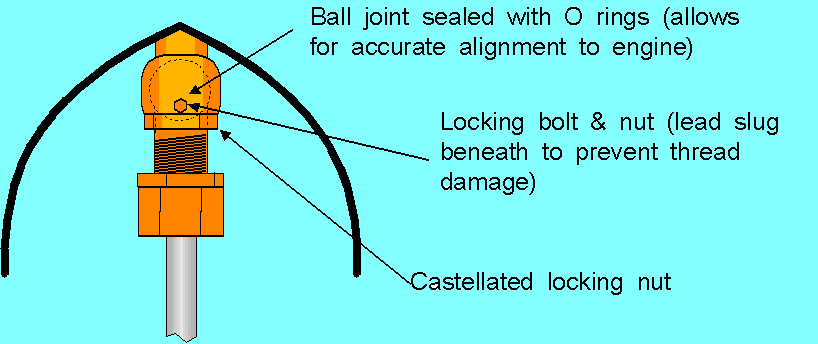
This adjustable gland is most often found on GRP boats.
It consists of a ball joint, sealed by O rings and is designed to allow easy aligning of the shaft and engine during installation
Fig 4
Fig 5
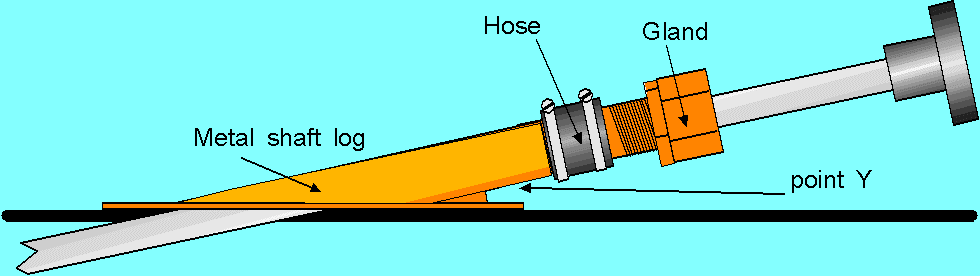
This is typical of the way glands are fitted to planing and semi-planing grp hulls. The hole in the metal shaft log is oversize so the shaft can shake about with the engine. The rubber hose and gland seals this hole.
Fig 6
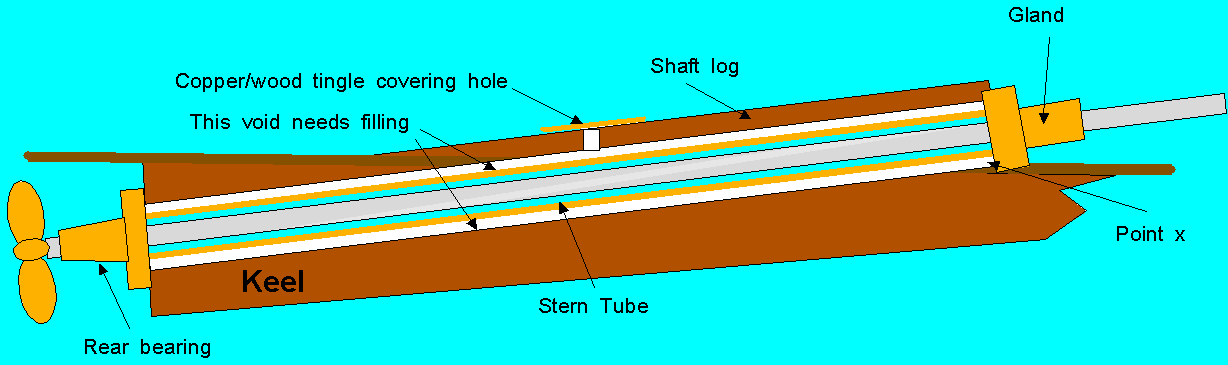
This is typical of the stern gear on a wooden hull. Note that the shaft runs in a tube (the stern tube) that may well be full of water. The tube is in an oversize hole that was drilled when the boat was built.
Locating leaks.
If a boat is taking water from the general area of the sterngland many people's first reaction is to tighten the gland, however there are other things that should be checked.
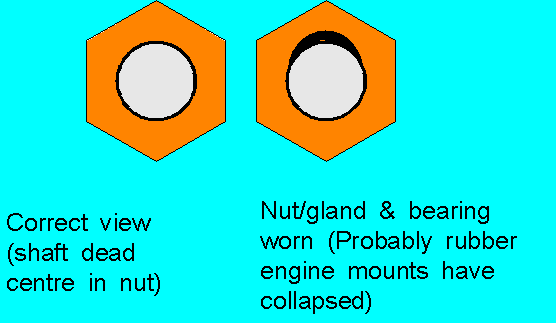
Clean the black "gunge" from the face of the gland and inspect the hole from which the shaft emerges.
Fig 7
If the shaft is not leaving the gland concentrically with the hole and gland (as shown on the right) the gland is worn and may never stop leaking for any length of time. On boats with flexible engine mounts this is often because the rubber mounts have collapsed with age and the engine has not been re-aligned with the shaft every few years.
If the mounts collapse on a GRP boat and the situation is ignored the shaft can wear right through the bronze shaft log. This creates a leak (with a sharp edged to the hole) at point Y. Likewise if the rubber hose on this gland is not checked for condition it can perish and leak. If it splits there is a good chance that the boat will sink.
If you have an adjustable gland (Fig 4) a slight bow in the shaft or even an engine "jumping about a bit" can cause the ball joint to work loose and then the O rings get damaged and the joint leaks.
It is important to have a very good look at the area around point X on wooden boats (fig.6). The gap between the stern tube and the shaft log was traditionally filled with white lead and grease. I doubt you can easily obtain white lead now, so I mixed up putty and grease to a stiff cream consistency and used that. Take the nozzle off a grease gun and use that through the hole that should be found under the tingle and located on top of the shaft log. This fills the void and prevents water leaking between the log and tube. I used to check the hire fleet every year. Some boats have a built up shaft log made of planks. In this case they may have filled the gap with pitch. This is fine as long as it does not crack.
Adjusting the gland
Convention has it that a gland should drip between once and twice a minute, and if you have a "yellow metal" shaft this is vital to prevent unacceptable shaft wear. However if you leave your boat for long periods you have to rely upon an automatic bilge pump, rely upon a film of grease to keep the gland watertight, or tighten the gland before leaving the boat and slacken it for running.
I experimented on the hire fleet and found that if the gland was tightened so the drip just about stopped, but a bead of water formed where the shaft leaves the gland when the greaser is used, the shaft wear on mild and stainless steel shafts was acceptable. It is for the individual to decide to follow convention or not. After tightening the gland it should still be possible to turn the shaft by hand without undue force. When running the gland may get warm to the touch, but it should never get HOT.
To carry out the adjustment slacken any locknuts and then tighten the adjusting nut until the gland drips as you require. On glands like Fig 1 please ensure that you tighten the nuts each side of the gland evenly. Remember to re-tighten the locknut(s) when you have done.
Never adjust so far there is no more adjustment left for a later occasion, if you do the gland will leak and you will be unable to stop it. When you have about 12mm (half an inch) of adjustment left it is probably time to think about re-packing the gland.
Preparation for packing
Having decided that it is now time to pack the gland you must first of all consider how much wear you found when you inspected the front of the gland. The greater the visible wear the more worn the bearing surfaces are likely to be and thus the greater volume of water is likely to leak in when the packing has been removed. If the gland has a remote greaser (as most canal boats) tightening this down may well stop almost all leaking. If you are concerned about the amount of water that may leak in on a narrowboat you can remove the weed hatch and wrap cling-film or mastic bandage into the space between propeller and back of boat - but please remember to remove it before putting the boat in gear!
I have yet to see a stern gear so badly worn that the bilge pump had to be kept running. In most cases I would say you would have at least half an hour of leaking before you have to think about pumping the bilge.
Next you need to find out what size and type of packing is required. The packing comes in white and black varieties. Seagoing boats will probably use white because the black might contain graphite which would, in theory, tend to corrode the propeller, freshwater boats can use either.
The packing is likely to be one of three sizes 6mm (1/4"), 8mm (5/16"), or 10mm (3/8"). If your boat manual does not give this information you need to measure it.
Fig 8
Remove the nut(s) and any pusher and measure the gap between the shaft and "outer" in the positions shown in fig 8.
Replace it all and tighten the gland to stop any leaks. Write the size required in your log or boat manual and the visit the chandler. They may cut you a length from a roll or sell you a pre-packaged length. In most cases whatever you are sold should be enough to do the job.
Doing the job
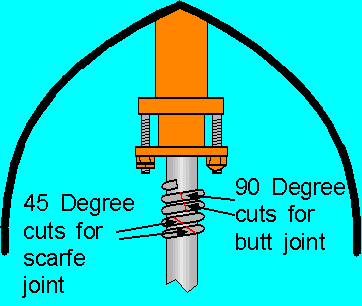
Again convention says that the packing must be cut into rings, so wrap it around the shaft as shown in Fig 9 and using a very sharp knife either cut at right angles to the packing to form a ring with a but joint or cut at about 45 degrees to the packing to form a scarf joint.
.
Fig 9
Beware because unless the knife is very sharp you stand a good chance of fraying the end of the packing and it is also very easy to cut either too long or too short. Any of these faults can cause the gland to leak more than it should.
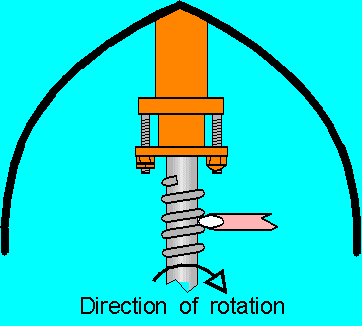
Unconventionally (at your own risk) note which way the shaft turns in ahead and then wrap the packing around the shaft.
Put your finger between the rings of packing and move your fingertip around the shaft in the direction of forward rotation as shown in fig 10.
Fig 10
If the packing forces your finger to the stern the packing is wound as it needs to be. If your finger moves to the front, wind the packing in the opposite direction.
You will now have a series of accurately cut rings or one long length of packing and in that case you know which way to wrap it onto the shaft. So far there should have been minimal leaking.
Removing the old packing.
Some people simply add more packing on top of what is already there. This may be fine in an emergency, but the old packing will have lost a lot of its "body" and is likely to be hard and worn. It is best to repack from scratch, so you need to get all the old packing out.
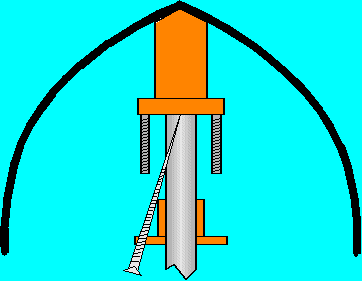
If you bought a pre-pack you may find instructions inside telling you to buy a special removing tool. I get the longest wood screw I can find with a Pozi/Phillips head (less likely to slip and stab you than an ordinary screwdriver slot!).
Remove the nuts and any "pusher" and screw the screw into the old packing (Fig 11). Then use pliers on the screw head to pull the screw and old packing out. Repeat until you can feel the screw scraping on bare metal.
Now the water may be jetting in, but it will be at low volume. This is where you will be grateful that you prepared the packing before taking the old stuff out! You have lots of time - so don't panic.
Fig. 11
Repacking the gland
Conventionally, take a piece of packing and push it down the hole using a blunt instrument (I had a length of mahogany I kept for the purpose, but nowadays I use a screwdriver). Note the position of the cut/join.
Put the next length in with the cut about 120 degrees away from the first one. Repeat for the next length and so on.
Do not totally fill or overfill the void. If you do you will have problems getting the parts back together and may well cross thread the big nut or jamb the pusher. Leave at least 3mm of space above the top packing ring.
The leak should now have virtually stopped.
Unconventionally, wrap the packing around the shaft in the direction noted before and just keep pushing it fully home, one bit at a time. Note, with this method the gland may leak a bit in reverse.
Adjusting the gland
If the gland is still leaking gradually tighten the nut(s), turning the shaft with your hand* until the drip either just stops or drips once or twice a minute.
Now you can pump out the bilge and double check that all locknuts are in place and tight.
Run the engine in ahead and astern for half an hour or so. Keep checking for leaks and adjusting (with engine stopped) as required.
Take the boat for a run. Keep feeling the gland for overheating and checking for leaks. Adjust if required.
- This will not be possible on a Lister hydraulic gearbox unless the engine is running, so take great care and make sure the engine is out of gear before getting anywhere near the shaft.
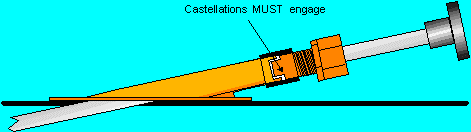
WARNING ABOUT FLEXIBLE GLANDS
If the rubber hose on figs 3 & 5 shows signs of deterioration you should change it. This is best done with the boat out of the water.
Under the special rubber hose is a castellated joint as shown in Fig 12
Fig 12
If the castellations (more correctly known as dogs) are not properly engaged the twist imparted to the rubber by resistance in the gland may well be enough to tear the rubber apart. So to prevent sinking always make sure the hose is the correct stuff for the job and that the whole thing is correctly assembled.
Packless glands
Certain packless glands utilise a rubber boot on the shaft that holds a ring seal against the face of the stern tube. As with any "rubber" component one must take care to ensure it is changed as soon as there are signs of the "rubber" deteriorating. Certain types are designed so you can fit two onto the shaft. A working one and a back up one some way up the shaft. If the working one fails you can cut it off and then fit the spare in its place without taking the boat from the water.
The gland must be adjusted whenever it starts to drip to excess. They are supposed to drip about once every minute or so, but privately owned boats which spend a lot of time out of use would either sink or flatten their batteries via the automatic bilge pump.
Most private boats would adjust the gland by tightening the big nut/sleeve until the drip just about stops, the stern tube greaser is then used to finally seal the drip at night and when the boat is left.
If the nut/sleeve is fully tight or if the gland will not stop leaking, the gland needs re-packing. If the engine has dropped or been misaligned the gland and bearing may well be worn egg shaped. This will prevent the packing sealing, or, more likely, cause the packing to be shredded inside the gland. Always carefully inspect the bore of a gland which will not stop leaking to make sure it is not worn
The Greaser
This is often referred to as the stern GLAND greaser but, in fact, it actually lubricates the inboard shaft bearing and in boats with plain outboard bearing, that also.
Whatever type of greaser you have fitted your lecturer would NOT ADVISE the use of "water pump grease" especially if you have a plain outboard bearing. This grease is too thick and is difficult to get into the bearing.
Plain outboard bearings use the grease or emulsion of grease and water passing down the stern tube for lubrication, so ensure they get an adequate supply.
Rubber (cutless) outboard bearings should be grease resistant, but you I would not put them to the test. With this type of bearing be more sparing with the stern gland greaser.
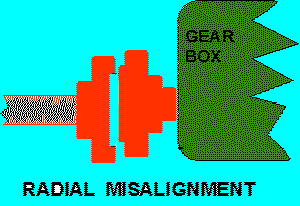
This topic follows stern glands and shaft logs because, as already stated, an out of alignment shaft will cause bearings and glands to wear, and thus leak. They also cause overheating of the gland and bearing and excess vibration and noise.
SHAFT ALIGNMENT
The easiest way to avoid these problems altogether is to use a suitable flexible coupling so the engine and shaft does not have to be aligned.
There are three types of flexible couplings:
Anti-torsional vibration couplings - these are characterised by some form of rubber inserts and are quite stiff, in fact they are usually impossible to bend by hand. They MIGHT allow a small amount of angular misalignment, but all one can be sure of is that they smooth out the torque from the engine and cushion the engine from anything which tries to stop the prop. This type of coupling should be aligned.
One piece flexible couplings - this type allows a limited amount of angular and radial (vertical/horizontal) misalignment. They are more flexible than type one. "Centaflex" typifies this type.
Never exceed the amount of misalignment quoted by the manufacturer. The gearbox and shaft should be initially aligned with this type AND checked every year. A solid dummy coupling is often used to replace the flexible coupling whilst aligning the shaft.
Flexible "jack shaft" types - typified by "Aquadrive" or intermediate shafts containing a pair of vehicle universal joints. These is the only "fit and forget" couplings as far as alignment is concerned
They might need greasing regularly (if they are U.J. types I would insist they have a grease nipple fitted).
They will require a thrust block to transfer prop thrust to the hull, otherwise they will "dog leg". The thrust block might be part of the assembly (Aquadrive), otherwise the thrust block will also need regular lubrication.
These types allow the use of very flexible engine mounts if required.
This is a very bad name - you actually align the engine. It is far easier to demonstrate the procedure than to explain it in text.
First, loosen the stern gland so the shaft can be slid back and forth, then remove the bolts holding the half couplings together (fit dummy coupling if required).
Slide the shaft back so the male "land" come free from its recess.
The shaft will now "flop about" to a greater or lesser extent - much greater if you have a flexible shaft log. Using scrap block of wood pack the shaft so it will still slide, but is held centralised within the free play.
Slide the shaft forward until the couplings meet. The land should slide into its recess. If it does not the shaft is out of radial alignment.
This engine needs lowering to align the couplings.
The engine might also have to be moved sideways on its beds to cure radial misalignment.
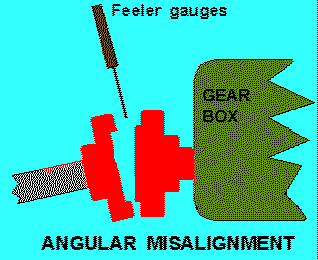
Next use feeler gauges ALL ROUND the gap in the couplings to check the angular alignment.
To cure this
misalignment the front of the engine has to be raised, but in doing this the gearbox coupling will move down, so the engine will also have to be lifted.This procedure of raising and lowering various parts of the engine will eventually bring the shaft into alignment.
Try and get the gap to less than 0.1mm.
Slide the shaft forwards, it should slide home easily, recheck with feeler gauges.
Check tightness of engine mounts and recheck alignment.
Bolt up couplings and tighten stern gland.
METHOD OF RAISING AND LOWERING THE ENGINE.
Some engines are supported on long, threaded studs between two nuts. These are the easiest to raise and lower, they are also the most likely to drop when the nuts work loose.
Another method is to use a pair of (metal I hope) wedges under each foot which are slid over each other to raise or lower the engine. These can slide out by vibration and cause the engine to drop.
The traditional way is to cut shims from scrap metal
shaped like a square U. The engine mounts are loosened and the engine levered up. The shim is slid in place with the open end pointing DOWNHILL (towards the stern).
These work well but the engine needs tightening every time a shim is inserted to ensure it is absolutely flat.
FITTING COUPLING TO SHAFT
When considering how the coupling should be fitted to the shaft one should think about the cost of the shaft, what happens if the shaft gets bent, how likely the shaft will get bent, and how easy is the coupling to remove so the shaft can be withdrawn without removing the engine.
TYPES
Ideally, all couplings should also be fitted using a key to transmit the torque. Woodruff (half moon) keys are more reliable than square keys.The types of fixings fall into these categories:
Industrial - these were originally designed for use in machines, and are characterised by a number of socket screws around their circumference or large collet nuts to tighten the coupling to the shaft. These are easy to fit and to remove (providing they have not gone rusty), but I am very unsure about their ability to withstand bent shafts. These are very popular.
Shrunk on - these have a slightly smaller hole in the coupling than the diameter of the shaft. The coupling is heated to expand it so it (in theory) slides over the shaft. These are often bored out to a sliding fit and a single bolt drilled into the shaft to take the entire prop thrust. A properly shrunk on coupling is fixed for life, so it is very difficult to remove. These do not respond well to bent shafts - they work loose.
Taper pin - the coupling is bored, vertically, to one side of the shaft and the hole reamed to a taper. The hole is half in the shaft and half in the coupling. A taper pin is then driven into the hole. The pin tends push the coupling to one side, especially if the bore or shaft is worn, so it is impossible to align radially.
Taper fit - both ends of the prop shaft are machined to standard Admiralty taper (as if the prop was going to be fitted to both ends) and the half coupling machined so it is also tapered and has a rebate to accept a nyloc nut.
By slackening the centre bolt and trying to "refit" the half couplings the gearbox flange nut will usually "break the taper" so the coupling is easy to remove.
The bearings and stern gland will wear the shaft over time, so unless you are very unlucky simply reversing the shaft puts unworn surfaces into the bearings and gland and you double your shaft life.
The coupling copes well with bent or out of alignment shafts.
SERVICE LIST
You should now be in a position to produce your first service list for your boat. You can add to this as the course proceeds.
Every _________ hours (depending on bearings)
Check stern gland for leaks.
Turn down greasers. (also rudder greaser and thrust block if fitted) Stern glad at close of cruising to prevent drips)
Check sea inlets if fitted.
Every morning or 24 hours.
Check gearbox oil
Check engine oil
Check coolant level
Every 100 hours
Check engine mounts for security
Check coupling bolts
Grease any thrust blocks or joints fitted with grease nipples (Plus after any submersion).
Check oil coolers for blockage
Annually
Adjust gland packing
Repack shaft log (wooden boats)
Close inspection of flexible shaft logs.
Check shaft alignment.
Lubricate controls and cable nipples.
As specified by manufacturer
Change engine oil and filter.
Change gearbox oil and filter.
|
||
| Back | Home Index |
On |