![]()
Home
|
|
|
Home |
CONTENTS
|
Introduction |
2 |
|
Major power line parts |
3 |
|
How the engine works |
4 |
|
|
|
|
Day to day & long term care & servicing |
|
|
6 |
|
6 |
|
7 |
|
8 |
|
9 |
|
|
|
|
Cooling systems |
|
|
10 |
|
11 |
|
12 |
|
12 |
|
13 |
|
14 |
|
14 |
|
14 |
|
15 |
|
15 |
|
15 |
|
16 |
|
|
|
|
Care of more systems |
|
|
16 |
|
17 |
|
17 |
|
|
|
|
The electrics |
|
|
18 |
|
19 |
|
19 |
|
|
|
|
Fault finding |
|
|
20 |
|
20 |
|
21 |
|
21 |
|
21 |
|
22 |
|
22 |
|
23 |
|
|
|
|
|
|
|
|
|
|
|
|
Aim of course
This course is designed to give the partners of "committed" boaters a basic understanding of the mechanical systems so they can:
Course philosophy
Where possible non-technical language together with access to marine engines and parts will be used to give a basic understanding of the operation of the engine and associated systems. The whole engine and system will be "broken down" into the major parts and the operation and day to day service of those parts will be introduced.
A selection of typical symptoms of faults will be discussed and simple faultfinding introduced.
Longer-term routine maintenance will be discussed to enable the students to form an opinion of any professional help they may wish to employ.
THE MAJOR PARTS
The diagram below represents the major parts of what we call the drive line and is drawn looking directly from above. These are the parts the "power" goes through between engine and propeller. Any specific boat may be very different, nearly all boats will differ in some way or another.
Anything to the left of the stern gland will be inside the boat and parts to the right outside the boat.
Engine Gearbox Stern gland
Prop. shaft Propeller
There are some variations to the basic design as shown below. These diagrams are drawn looking from one side.
The Saildrive
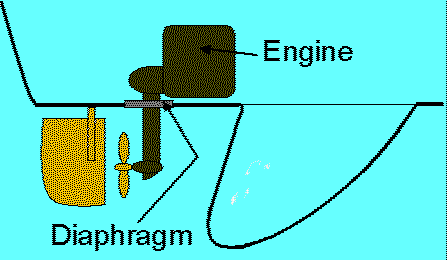
This is fairly common on yachts. The gearbox is the lump on the left of the engine
The shaft runs down inside the "leg"
There is no stern gland, but there is a single or twin waterproof diaphragm around the leg.
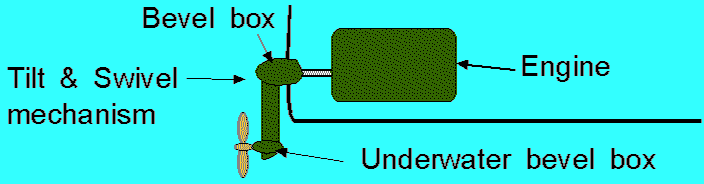
The V drive

This is found on both yacht and motor boats where the engine needs to fitted close to the stern of the boat.
The gearbox is fitted to the right of the engine and it may have the V box built in. This one uses a separate V box and two propeller shafts.
A stern gland is used where the shaft passes through the hull.
The Z drive or Outdrive
This is used on motor boats to get the engine close to the stern without using a V drive.
The gearbox is usually somewhere inside the leg. No stern gland is needed.
Hopefully you will now be able to identify the Engine, gearbox, shaft, stern gland and propeller on your boat or recognise what equipment your boat uses.
We must add the engine control lever and cables to the list of major systems. They do not often give trouble, but when they do it can be very difficult.
How the engine works
When you operate the starter all sorts of pieces of mechanism whirl around inside the engine. The important part to understand is the piston and cylinder. There may be almost any number of cylinders but most yachts, inland and smaller boats use between one and four cylinders depending on how powerful the engine needs to be.
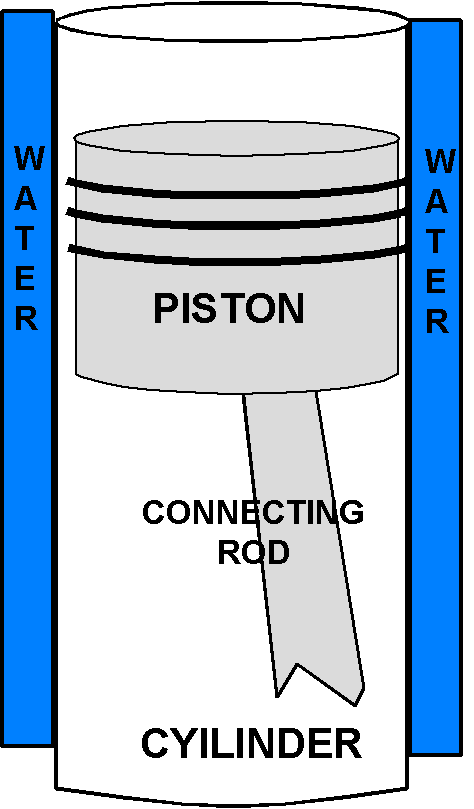
The cylinder is a metal tube. Most engines have water around the outside of it.
The piston is a bit like a small evaporated milk tin made out of thick aluminium. There are some springy metal bands or rings around the piston so it makes an almost airtight seal in the cylinder but can still slide up and down.
The piston is joined to the main spinning part by the connecting rod. The spinning part is bent into a series of U shapes to form cranks – one per cylinder.
This part transmits the power to the gearbox.
The top of the cylinder is sealed by a "lid" known as the cylinder head. This also normally has water inside it.
The cylinder head is a bit complicated because it has shutters in it that can let air and gasses in or out of the cylinder. These shutters are called valves. There are normally two valves per cylinder, one to let air in called an inlet valve and one to let burnt gasses out called an exhaust valve.
The cylinder head also has special "squirters" fitted into it to spray fuel into the cylinder. These are called injectors.
Operation
The inlet valve opens and the piston moves down, sucking air into the cylinder.
The inlet valve closes and the piston moves up, squeezing the air so tight that it gets hot. The temperature is about 300 to 400 degrees.
With the piston at the top some fuel, no larger than a pin head and usually much smaller, is squirted into the hot air where it catches fire. The fire creates pressure that pushes the piston back down. This is what produces the power and the temperature is about 1000 degrees
The exhaust valve opens and the piston moves up, forcing the burnt gasses out of the exhaust. There is still some pressure so you get a pop or bang as the exhaust valve opens.
This is repeated until you stop the engine.
Why the water?
The engine will melt unless the heat is removed. This is why water is all around the cylinder and cylinder head. Some engines do not use water. These have fins moulded around them and air is blown over the fins to keep them cool.
Why oil is needed?
The sliding pistons and the spinning parts need to be lubricated. This is done by storing oil in the bottom of the engine, which is then pumped or splashed around inside the running engine. The oil also carries a lot of heat away from the pistons so on some engines the oil needs cooling as well. We will look a little deeper into that under the cooling system.
The Engine and Systems
We now know the engine consists of a number of smaller systems. They are:
Unfortunately there are three different types of cooling systems and the features from one tend to get mixed into others. Because of the importance and complexity we deal with the cooling system separately and in more detail.
There is no day to day care needed and in the longer term difficulty in starting and cold start smoke usually initiates any servicing.
Lastly the two electrical systems that are vital to running the boat and engine:
There are some items that are part of more than one system like the alternator drive belt that may well also drive a cooling water pump, or a lubricating oil cooler that is part of the cooling system.
Day to Day and Longer Term Care & Servicing
The day to day care is the thing to concentrate on because this is what you need to know. The longer-term items are relevant to being able to hold a knowledgeable conversation with engineers when organising repairs and servicing and also judging their competence and propensity to "manufacture" work for themselves.
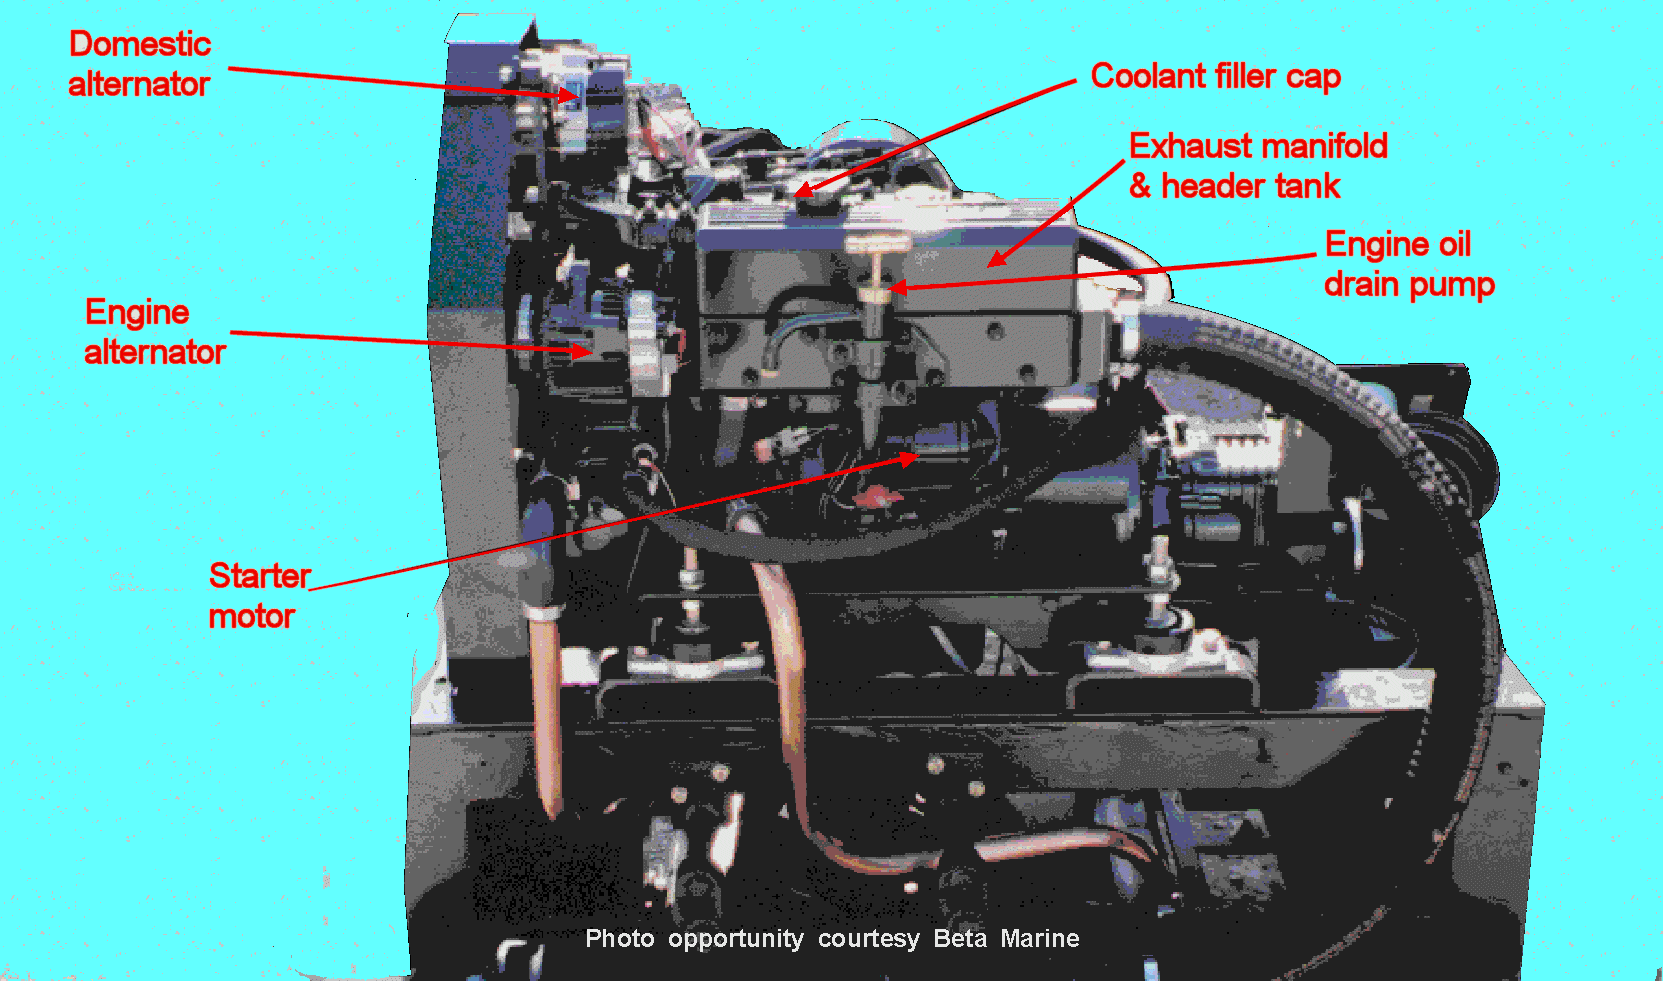
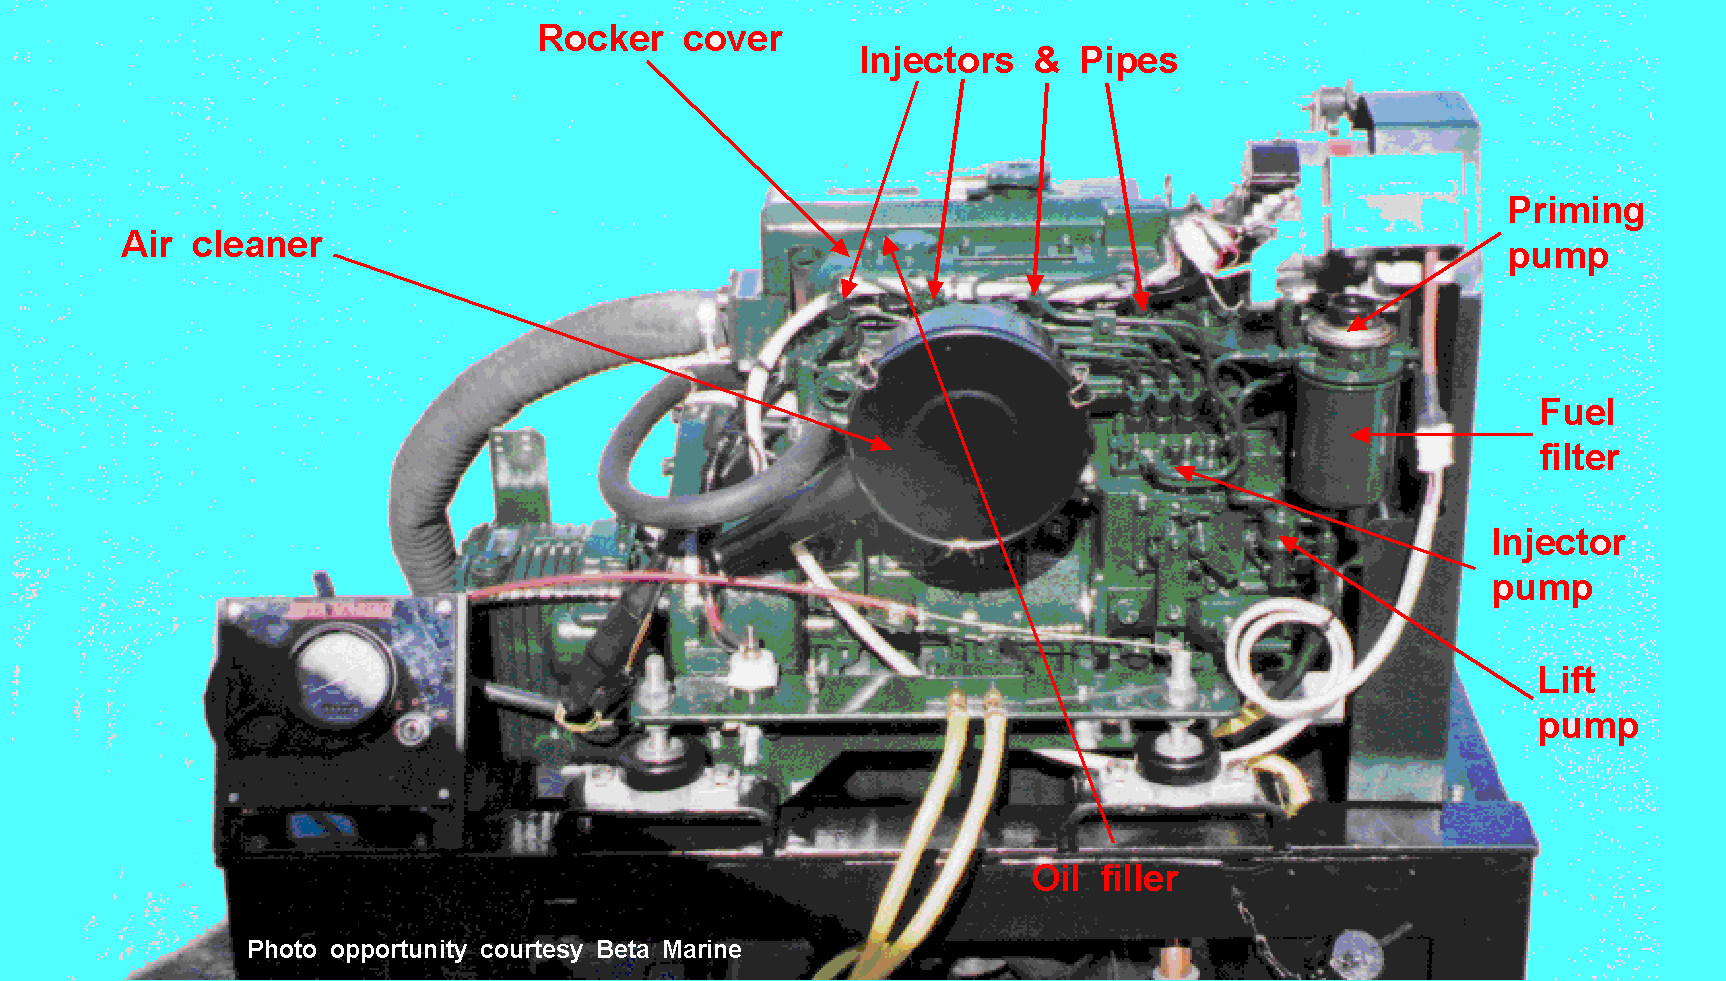
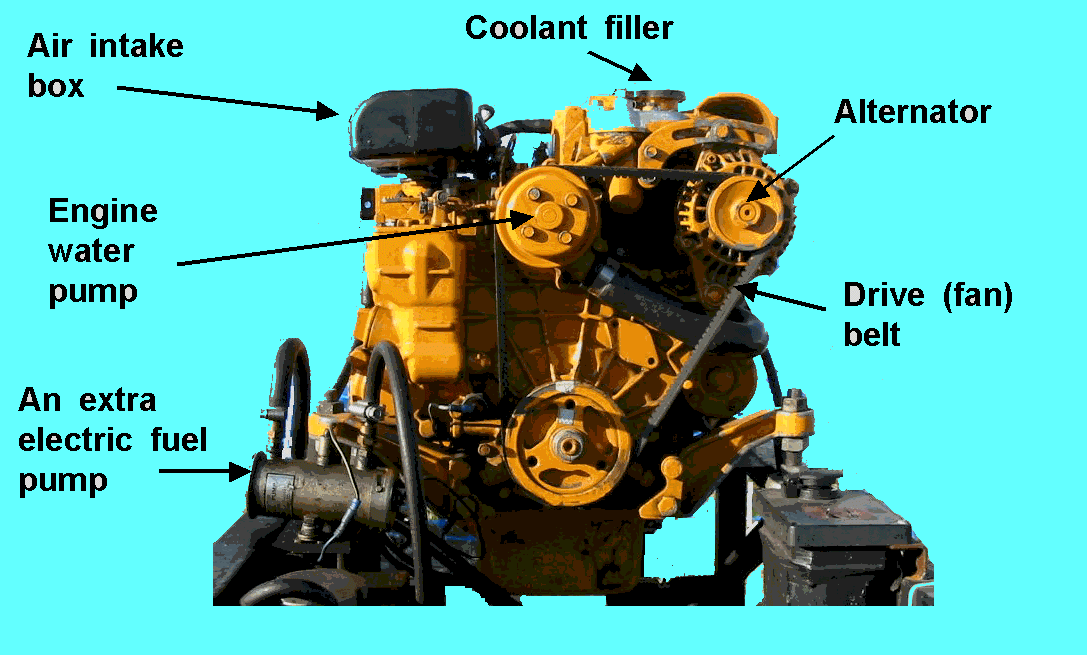
You really need the information contained in your engine manual to locate the items on your own engine but here are two pictures of the same four-cylinder Beta engine.
|
|
|
It would be a good idea to start taking frequent looks at the engine area of the boat before you have to look after it "in anger" because a lot of the day to day care involves looking for little problems before they develop into major problems.
The engine or "that big lump of iron"
|
Day to day |
At longer intervals |
|
Check oil level using dip stick Inspect for:
|
Change the oil and oil filter Ensure engine feet and mounts are tight and in good order. |
The air supply
|
Day to day |
At longer intervals |
|
Ensure no vents are blocked E.g. Intake vent in cockpit side locker blocked by sail bags etc. |
Change air filter element if fitted Check any hoses and ducts for blockages. |
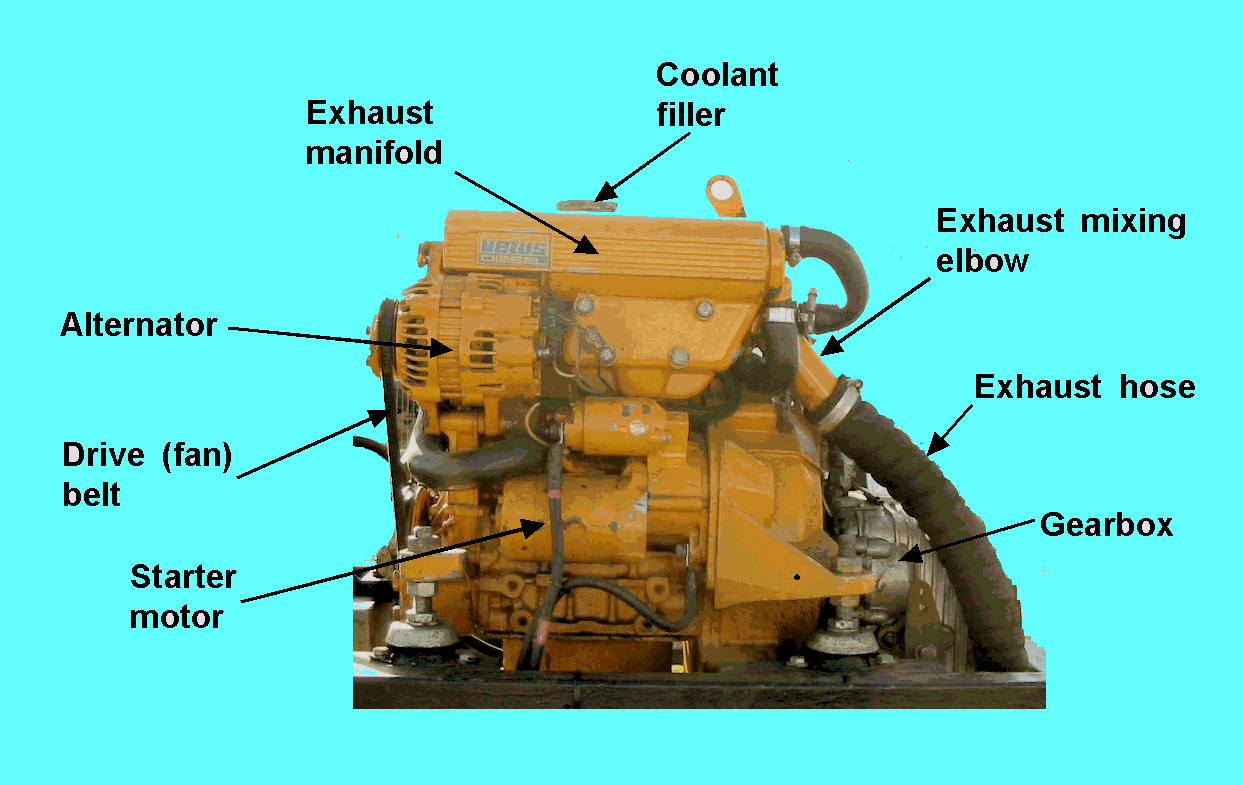
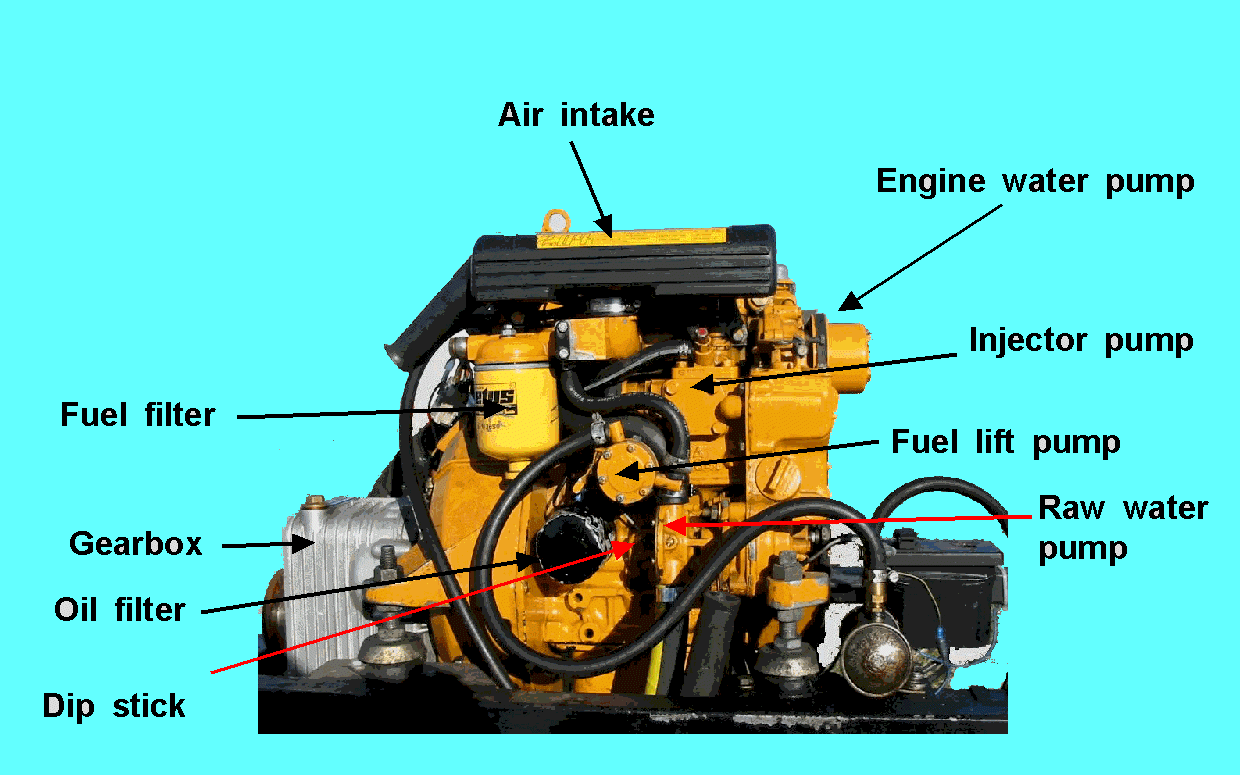
A Twin Cylinder Vetus Engine
|
|
|
|
 |
This engine is more typical of those you will find in small boats and sailing yachts. This example has a particularly difficult to access raw water pump. Many engines mount this pump at the front or back. Views shown (Clockwise) Left, right & front.
|
The exhaust system
If water comes out of the exhaust pipe when the engine is running or if the exhaust pipe is rubber hose it is known as a wet exhaust system.
If the exhaust is just like a car with metal pipes and no water it is a dry exhaust. All or all the accessible parts should be lagged with glass fibre tape or rope to prevent fires and injury.
Wet Exhaust
|
Continually when running engine |
Every year |
|
Listen to exhaust sound (for loss of water). |
Ensure any siphon breakers are working Check hose clips for tightness and security. |
|
After raw water loss has been restored |
At very long intervals (say 8 - 10 years) |
|
Check hose and silencer for water leaks |
Check mixing elbow for scale build up. Check inside of exhaust hose for possible de-lamination. |
Dry Exhaust
|
Day to day |
At longer intervals |
|
No task |
Inspect engine area and air filter for black dust – indicates leaking exhaust system. |
The fuel system
|
Day to day |
At longer intervals |
|
Ensure no danger of running out. Visual check for leaks on engine. Use additive when refuelling. |
Clean water traps. Change filter(s) Clean lift pump (if applicable). Check pipework. Check filler "O" ring & lubricate. Drain tank (if additive not used) |
If you run out of fuel or if you have to change any filters etc. you may well find you have to bleed the fuel system. Many modern engines are self-bleeding as long as the starting battery is adequately charged.
To bleed the system you need to identify the PRIMING LEVER on the lift pump. This allows you to pump fuel through the system. (Lucky boaters may have an electric lift pump. They just need to turn the "ignition" on for a while).
You also need to locate the bleed points on the engine fuel filter, the injector pump and the high pressure unions on the injectors. The engine manual will show these items.
Bleeding the system
Loosen the bleed screw on the filter and pump the priming lever until no more air bubbles come out of the loosened screw. (You may still get a very small number of bubbles)
Tighten screw.
Repeat at the bleed point on the injection pump.
Loosen (½ to 1 turn) the unions on the injectors.
Spin engine on starter or starting handle until fuel "spits" or drips out of the unions.
Tighten unions and attempt to start engine.
If there is no smoke from the exhaust and the engine is refusing to start re-bleed the system.
If the exhaust produces significant white smoke the fuel system is OK, there is another fault preventing starting.

This picture of part of the 4 cylinder Beta engine should help you identify the Injector Pump, Injector pipes, Injectors and any heater plugs your engine my have.
The injector pipes are usually grouped and clipped together.
The engine manual should have better pictures and descriptions.
Glow or Heater plugs
These are always just beside or just below each injector. They are connected together by either a set of electric cables or a flat strip of metal about ¼ inch wide. They unscrew from the engine.
|
Day to day |
At longer intervals |
|
No task |
When cold starting becomes difficult or when the engine smokes badly after starting remove each one and test by connecting across the start battery. You can use car jump leads – negative to plug body and positive to the small thread. |
The Cooling System
There are three main types of cooling system, but they can get "mixed up" in dry exhaust inland boats. Sea boats tend to conform to one of the three types.
Direct Cooling

The raw water pump (Jabsco) sucks water through a valve and strainer (sea inlet) mounted through the hull of the boat. The water may pass through a gearbox and/or an engine oil cooler.
The pump direct flow through the engine and into the "tank thing" that surrounds the first part of the exhaust – this is known as the exhaust manifold.
When the engine is cold water is prevented from flowing through the engine and cooling it by something known as a thermostat. When this happens the raw water bypasses the engine so flow is maintained to the exhaust manifold.
Water from the manifold is then directed into the mixing elbow and on through the exhaust hose and silencer.
Heat exchanger cooling
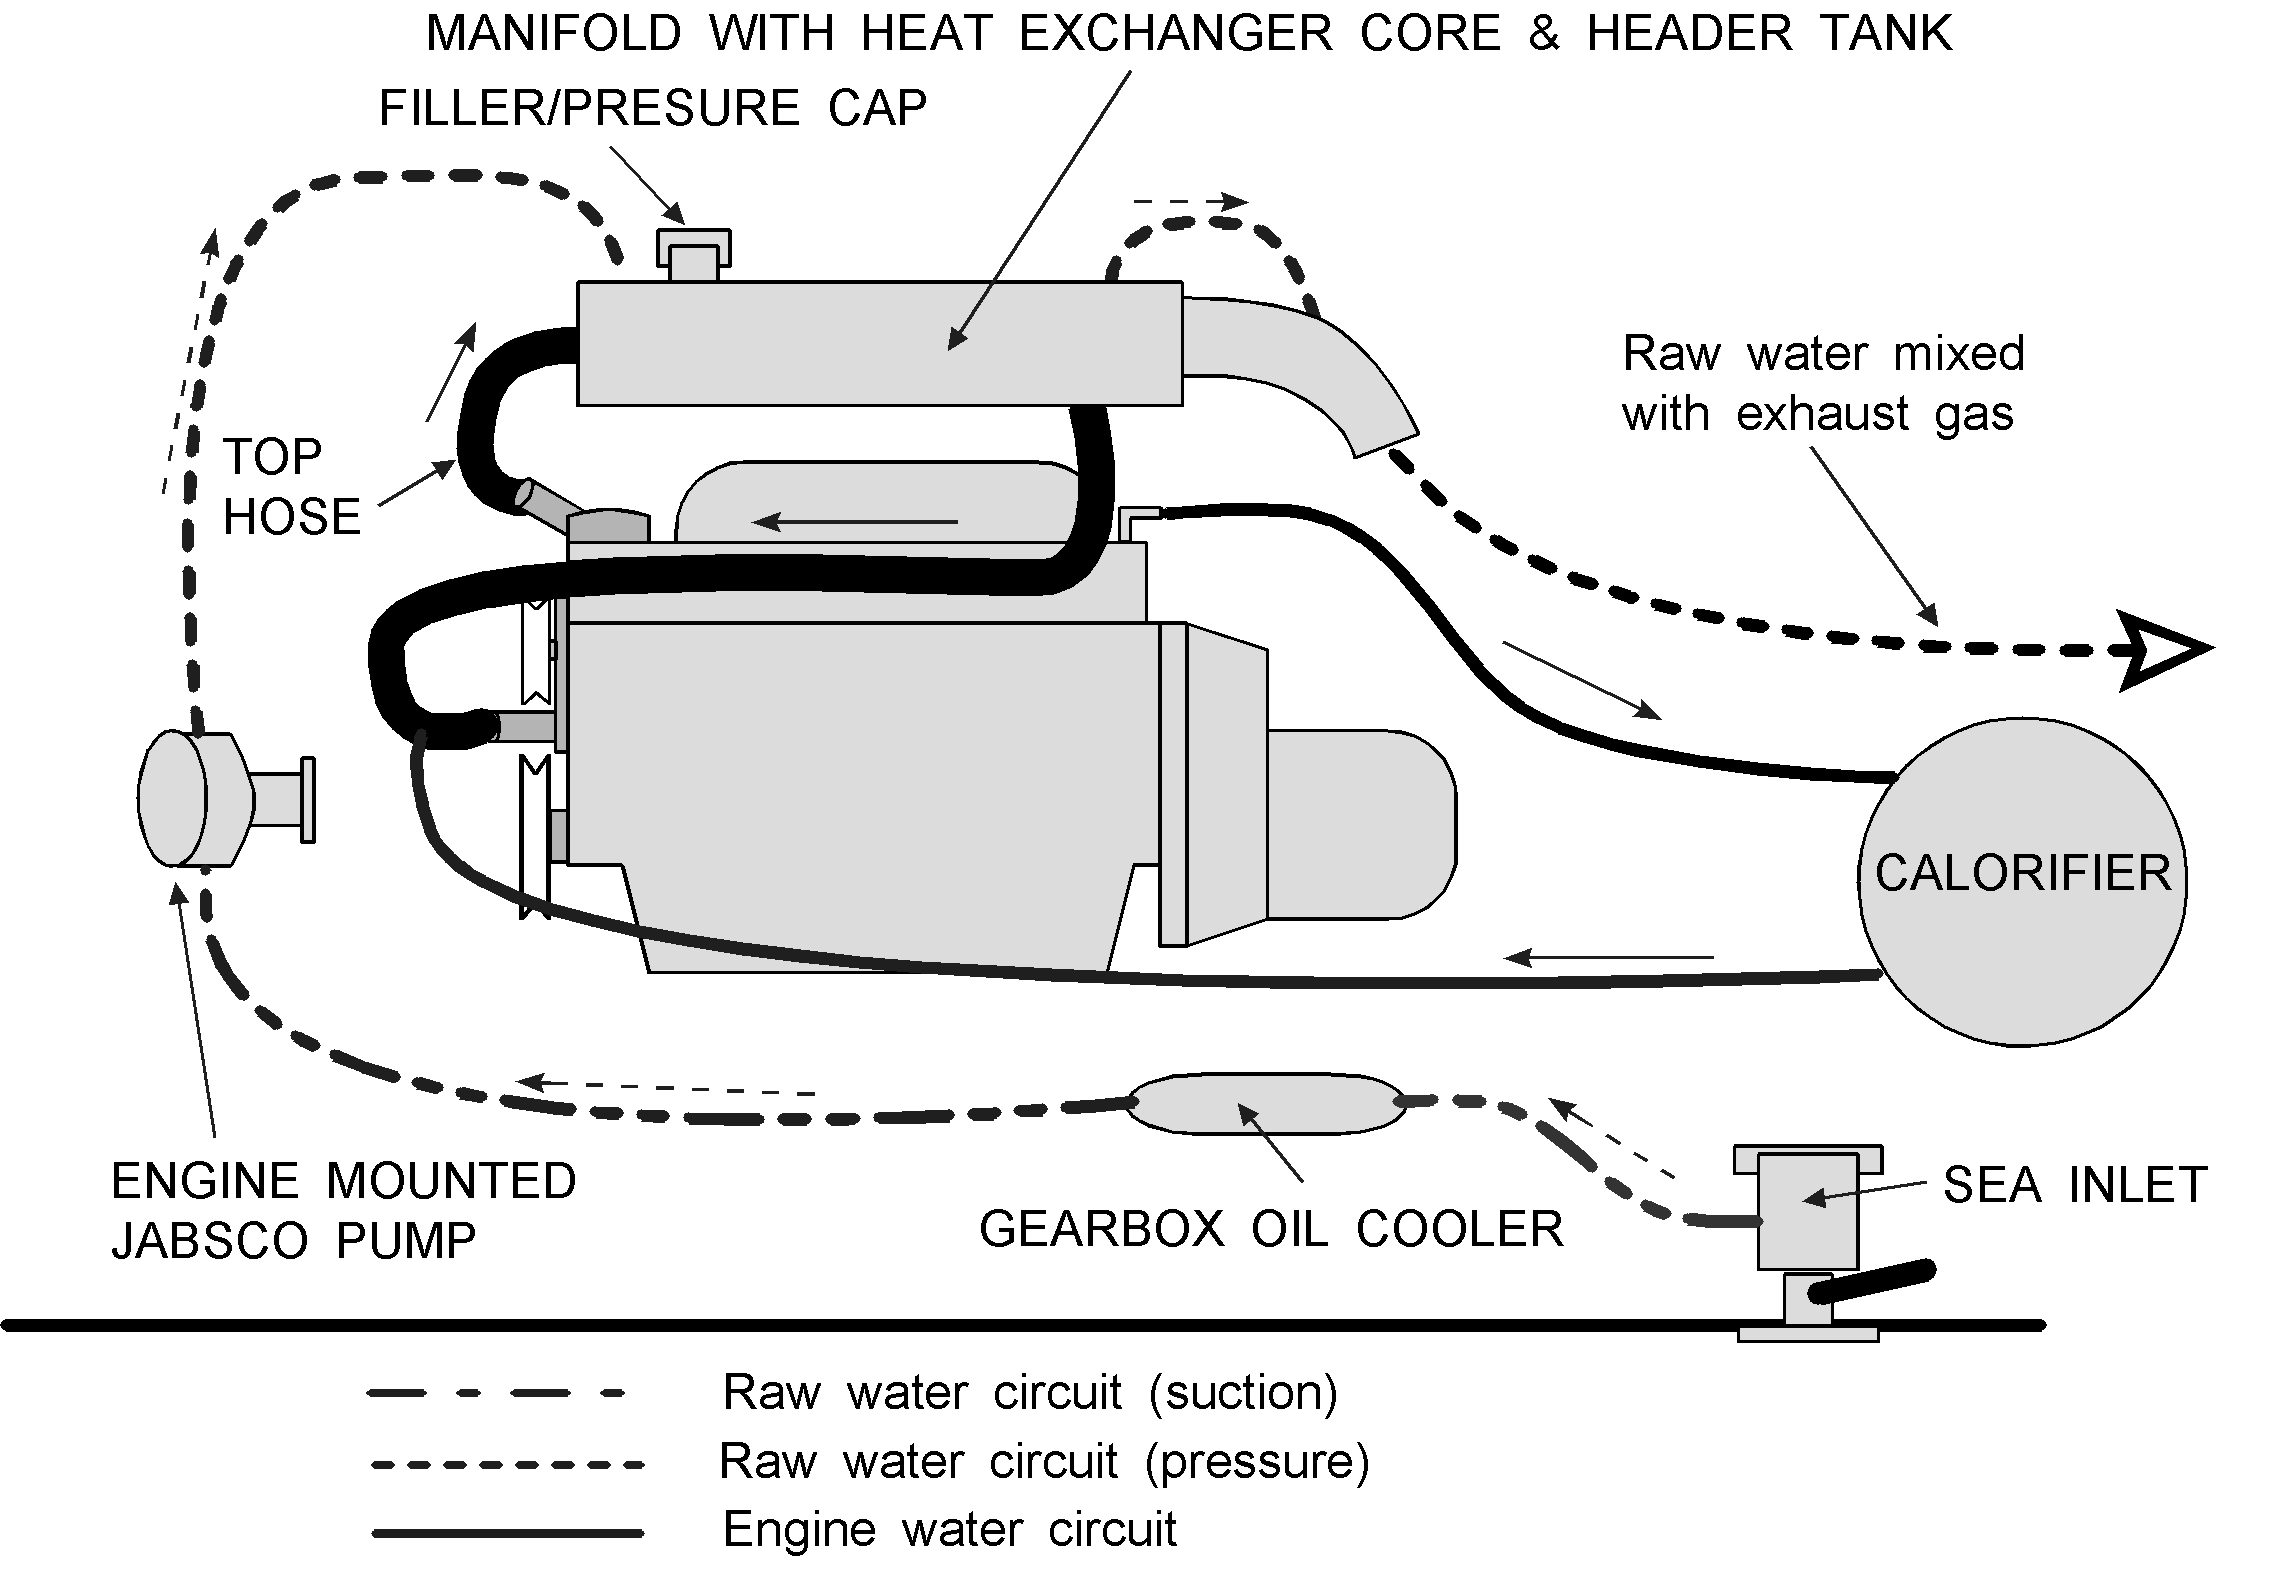
The raw water system is similar to direct cooling except it passes through a bundle of small tubes mounted in the exhaust manifold called a heat exchanger (older engines may use a separate heat exchanger).
Another pump circulates a mixture of fresh water and antifreeze from the engine and around the heat exchanger tubes that cool it.
There is a tank to hold the water/antifreeze mixture (coolant) that is usually part of the heat exchanger case or a separate plastic bottle. The tank is usually fitted with a pressure or radiator cap.
A thermostat is still used in the engine.
This system makes fitting a calorifier easy.
Keel or Tank cooling
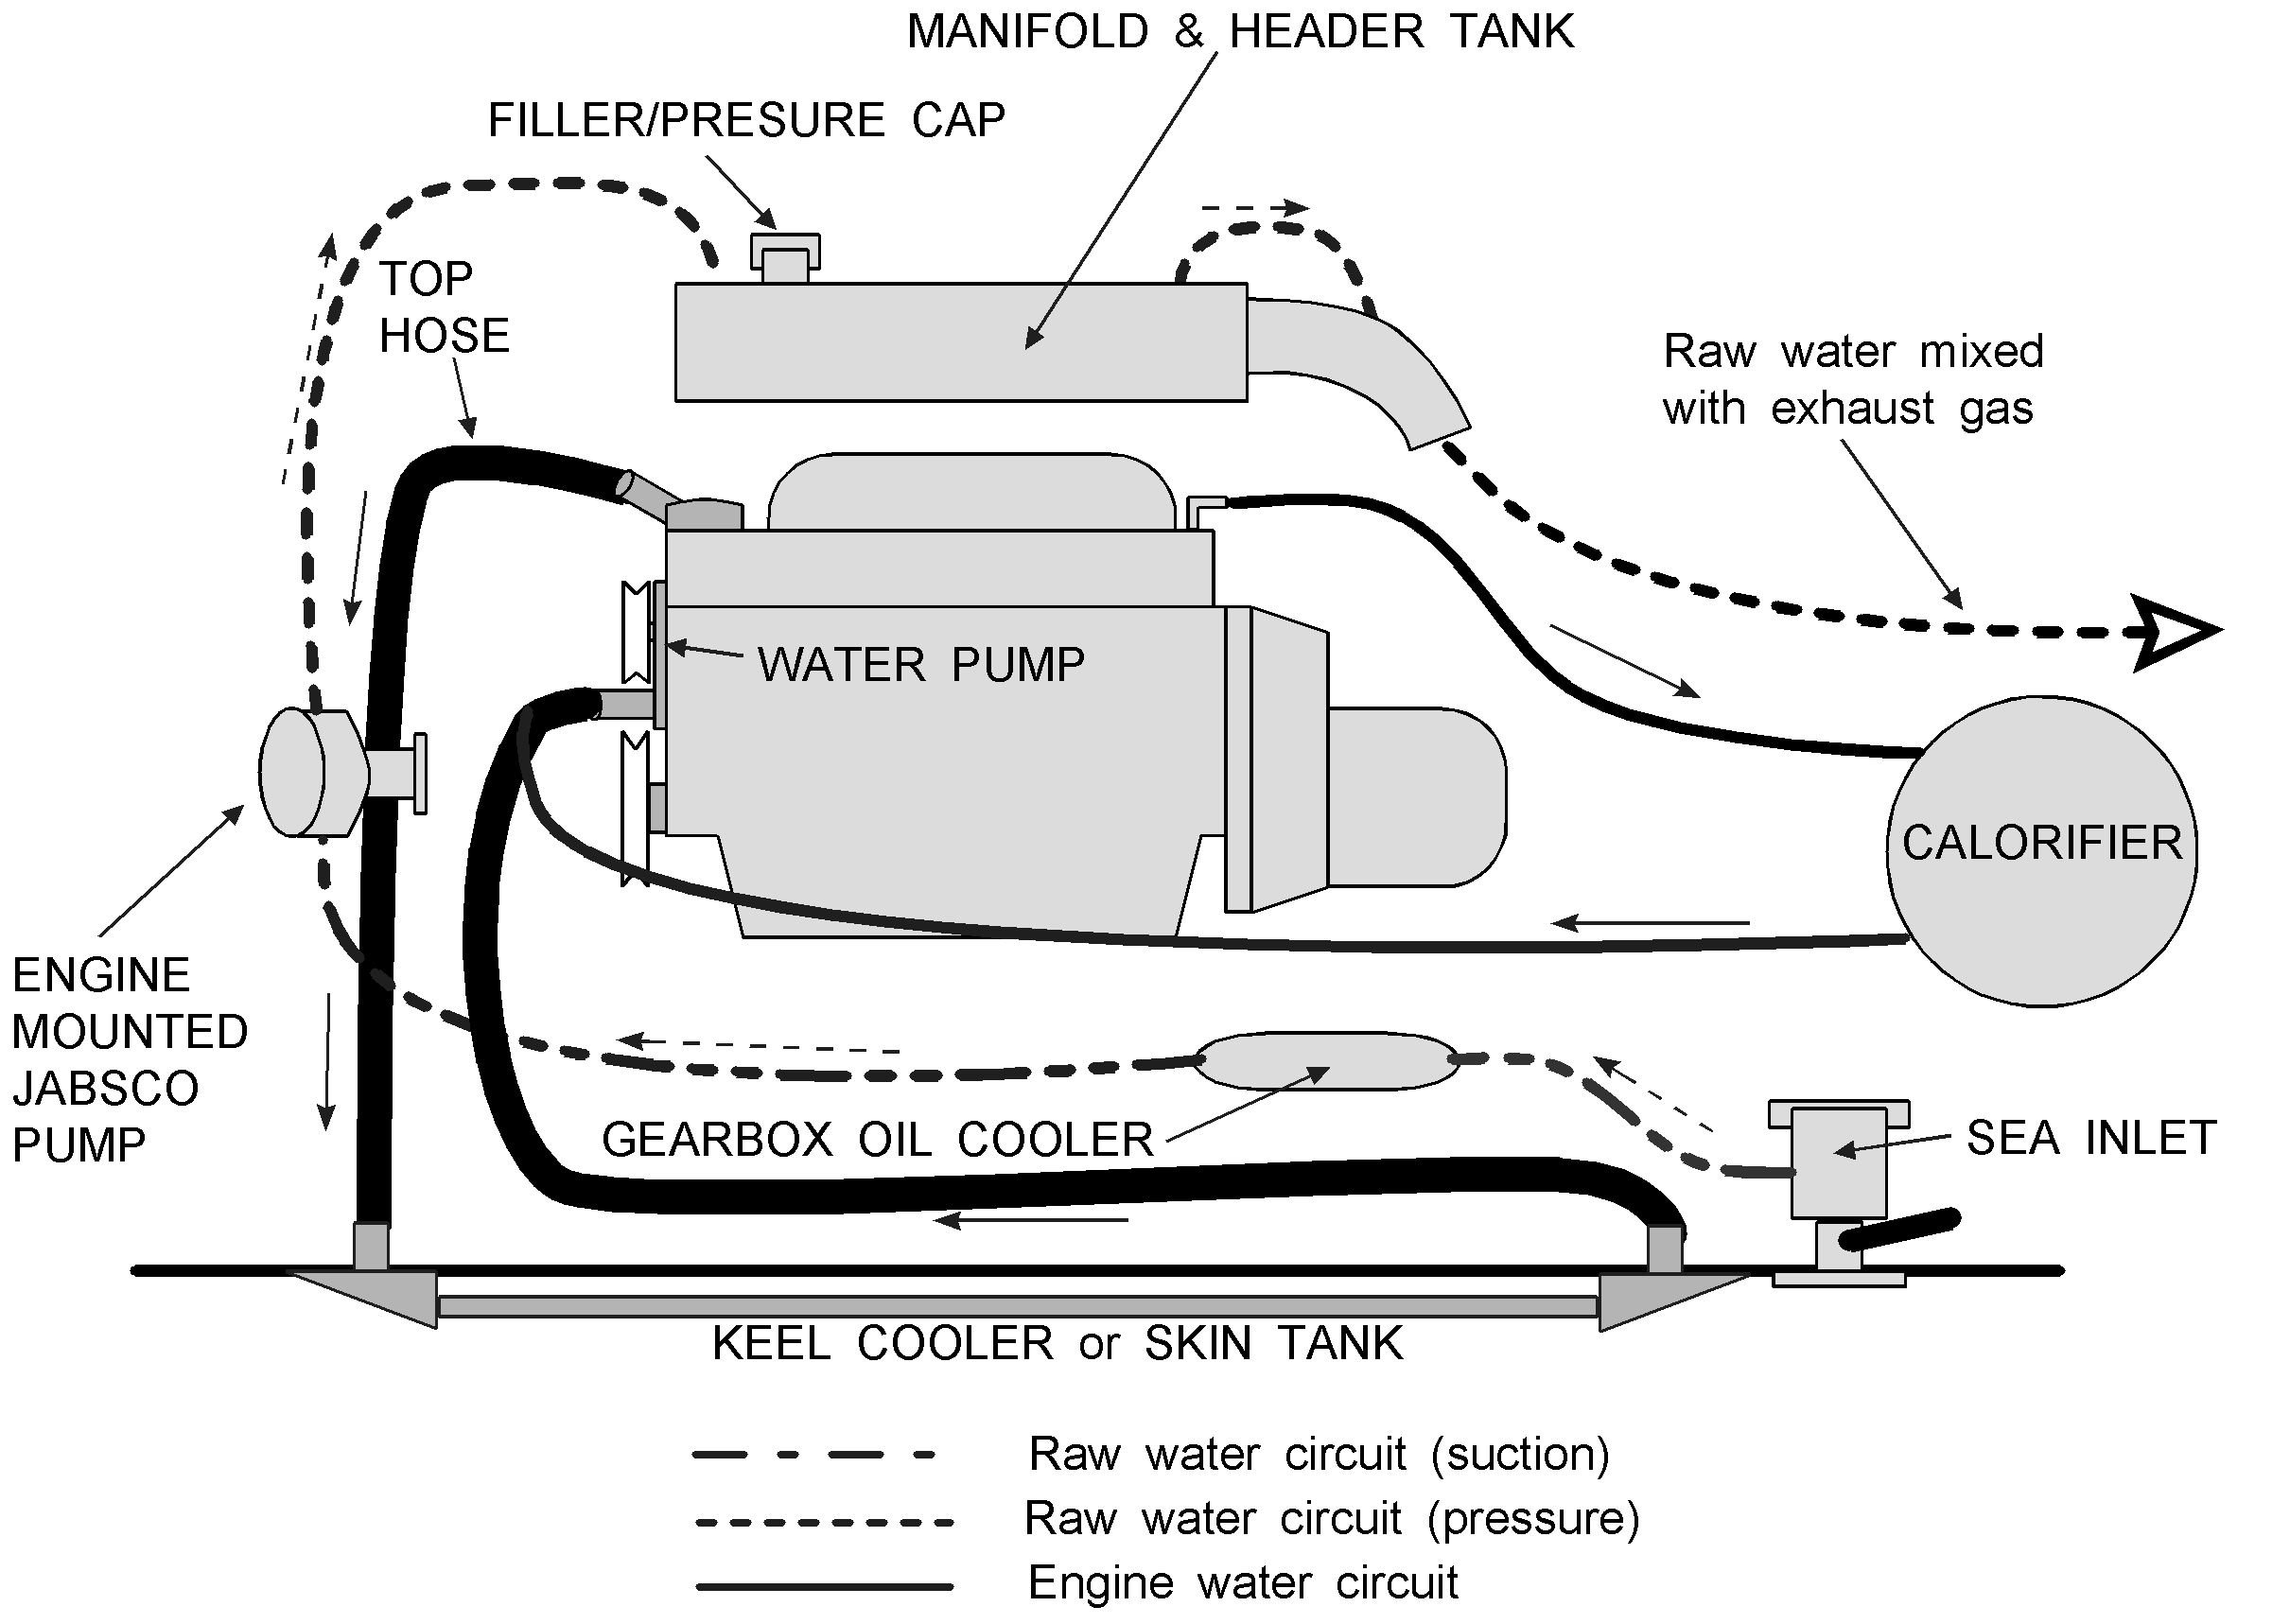
The raw water circuit is only used to supply water to the exhaust so on dry exhaust boats it is rarely used. In this case any oil coolers are fitted in the return from the keel cooler.
Dry exhaust boats pass the water/antifreeze mixture through the exhaust manifold.
The engine water pump pumps water through the engine and through the keel cooler pipes that are fitted below the boat so the sea/river/canal water cools the engine water.
Metal boats can use a large thin cooling tank welded to the side of the hull. This takes the place of the keel cooler tubes by passing heat through the hull into the water.
A thermostat and pressure cap are normally used on this system.
Cooling system component service
Hoses
|
Day to day |
At longer intervals |
|
Visual check. |
Inspect for signs of perishing/hardening or softening. Squeeze to check for internal "crunch" Change when require |
Sea inlet and strainer
|
Day to day |
At longer intervals |
|
Clean strainer before starting. Check strainer when raw water flow is reduced (listen to exhaust). |
Lubricate the valve and ensure easy operation. Check strainer seals and replace as required. |
Pressure cap/radiator cap
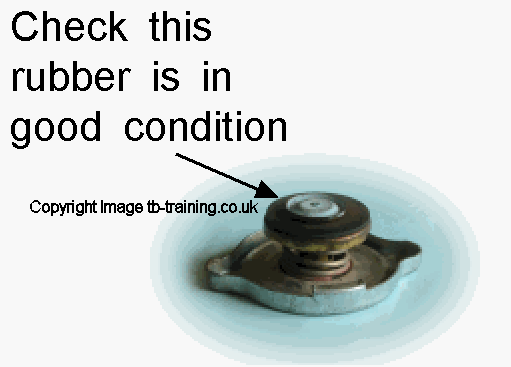
This is the cap through which you top up the engine. Even if you lost it and ran the engine with the cap off there will be no problem UNLESS running under high powers and speeds for a long period.
NEVER remove the filler cap from a hot engine – superheated steam will scald you.
NEVER fill a hot/overheated engine with cold water, use boiling water – using cold water might cause engine parts to distort and do expensive damage.
|
Day to day |
At longer intervals |
|
Top up coolant if required (leave at least one inch air gap). |
Inspect valves for signs of perishing/hardening or softening. Change when required |
Raw water pump (Jabsco or Johnson)
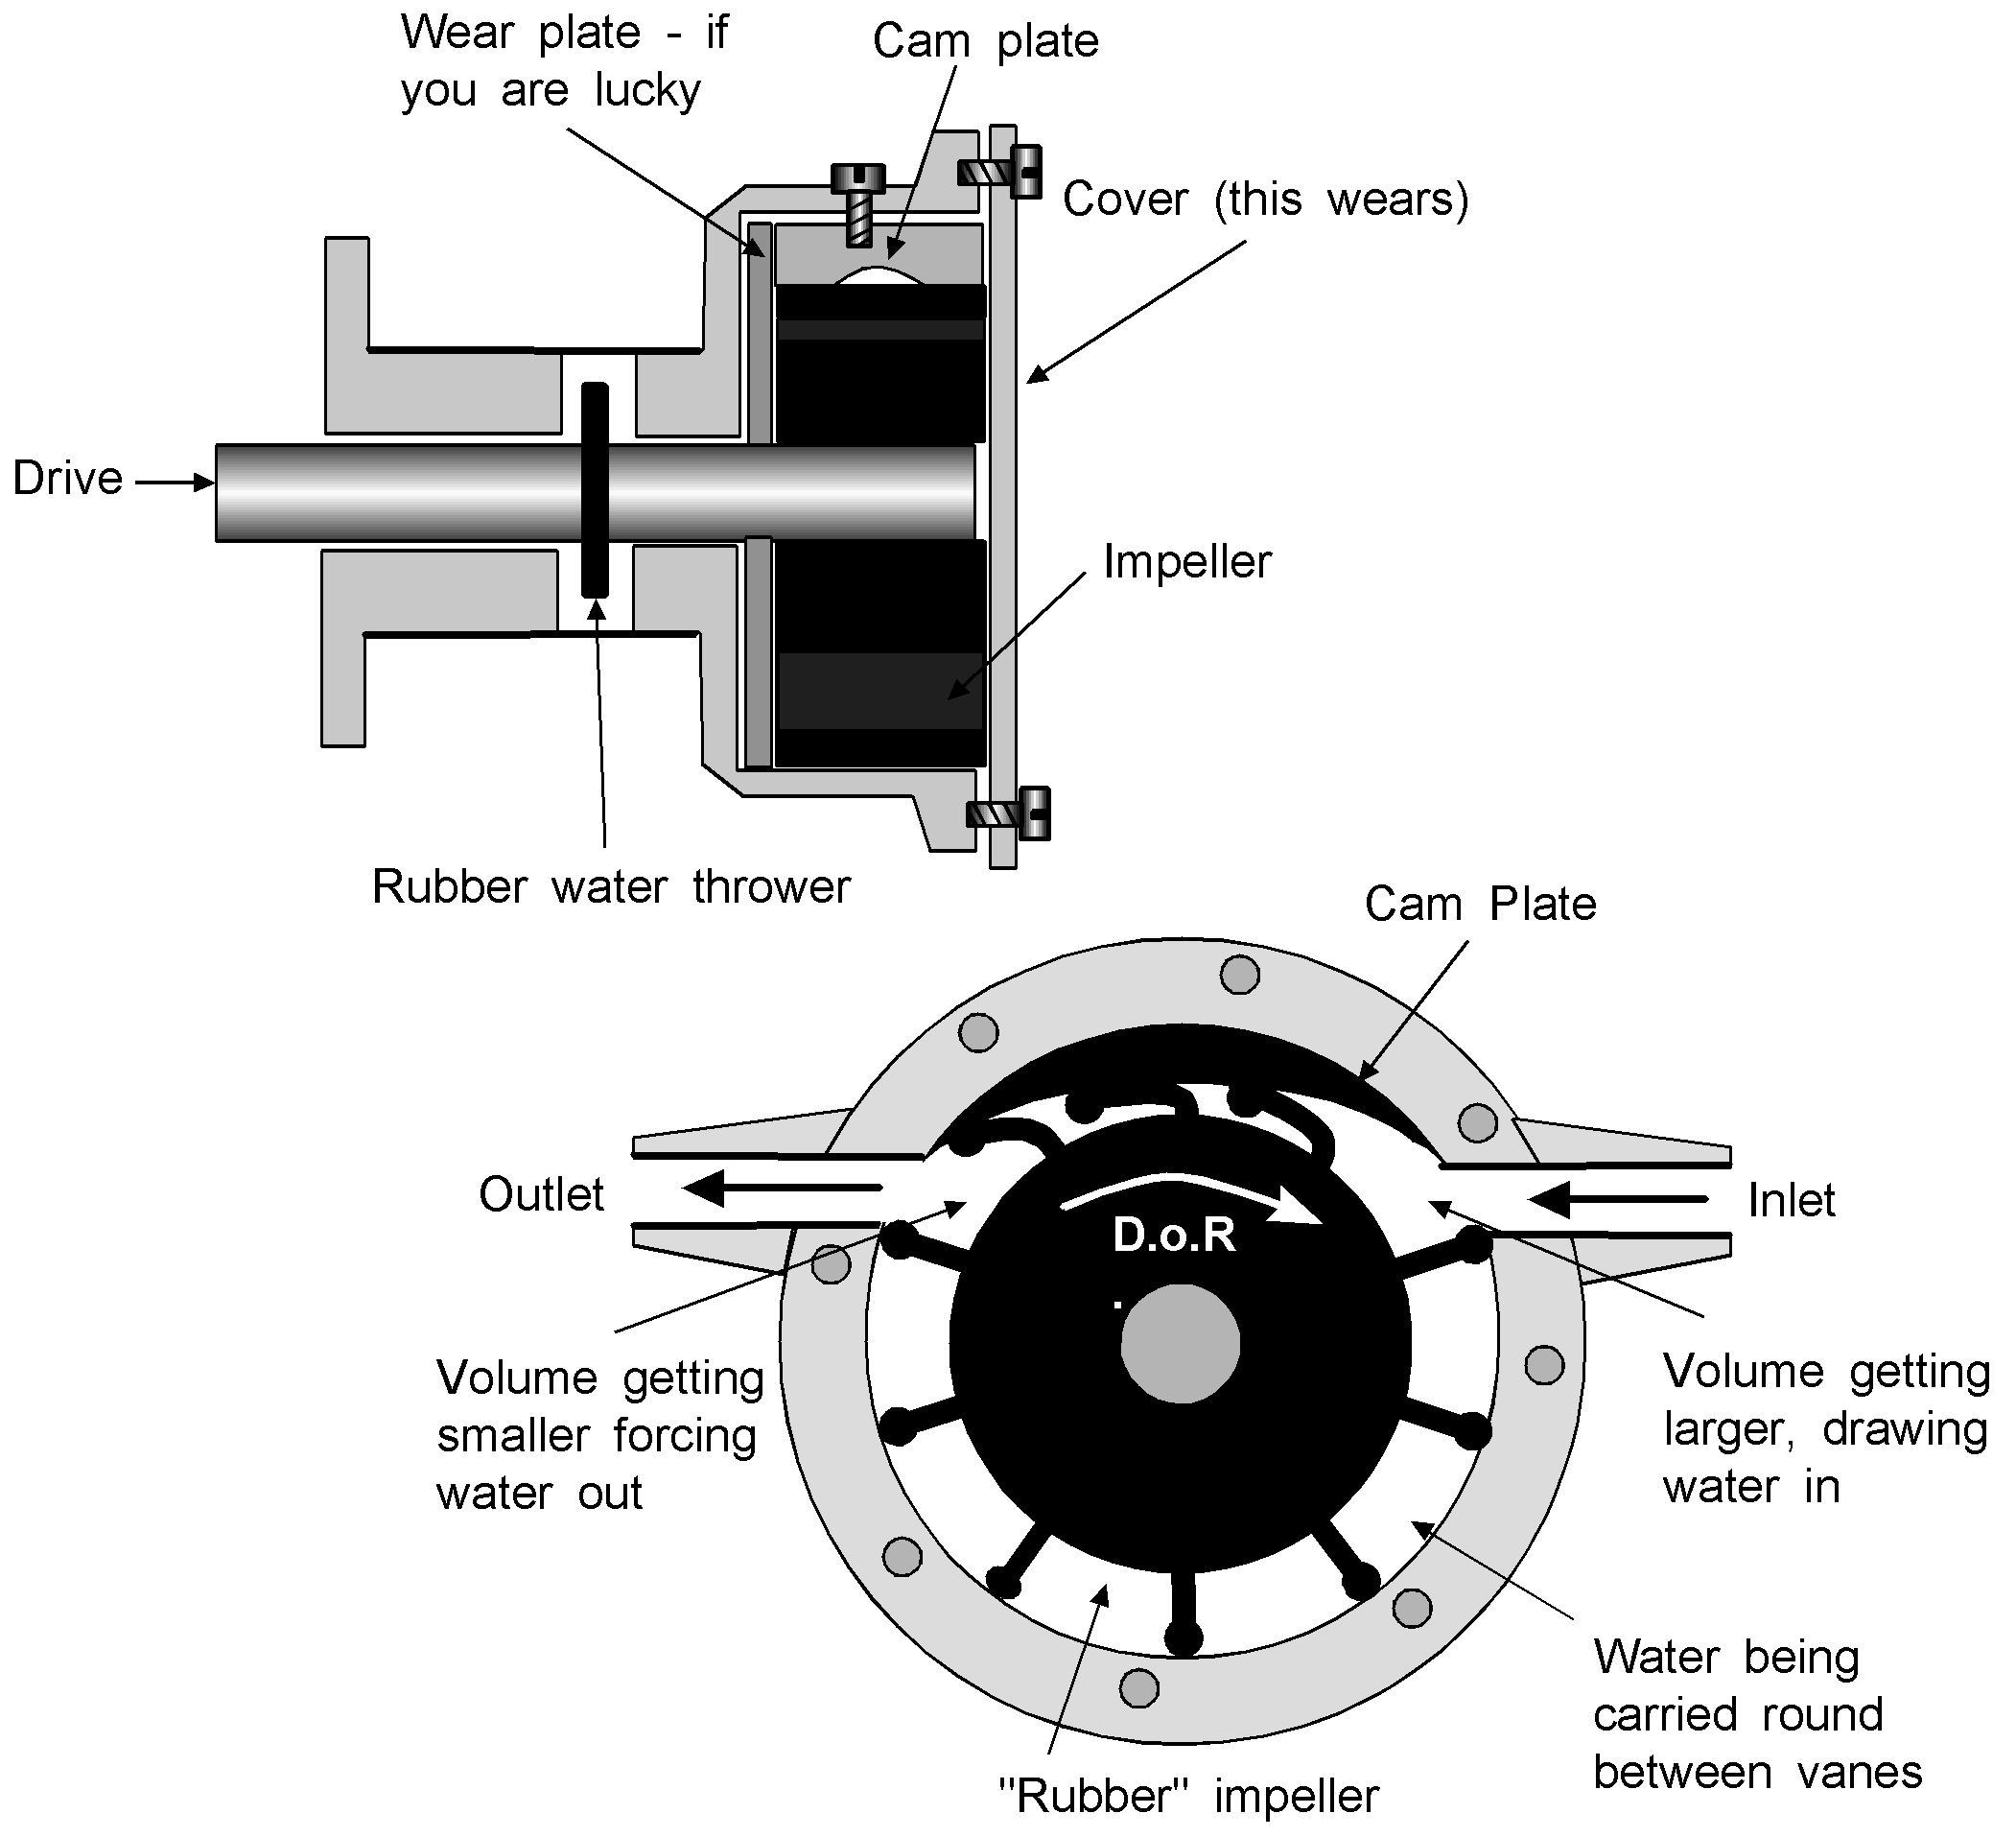
Made of brass or bronze and usually mounted directly to the engine.
Some are belt driven.
Older versions may have a grease cap like mini version of the one on some stern glands. Turn this down each day.
The rubber impeller is subject to wear and failure so sea and estuary boats should change annually. Save the old impeller and gasket as spares.
Always carry a spare impeller, gaskets and some spare cover screws.
A drip of oil or water from the pump is NOT normally critical so the engine can continue to be used.
|
Day to day |
At longer intervals |
|
Visual check. Turn greaser if fitted. Check impeller if raw water fails and sea inlet is OK. |
Check belt if fitted, adjust/change as required. Change impeller. Get any drips attended to. |
Engine water pump.
The engine water pump gives very little trouble but once it starts dripping or develops play in its shaft it should be changed before it fails completely. This is normally 10 years or more from new.
The drive/fan/alternator belt requires regular attention and changing. Keep the old belt as a spare unless it is damaged.
|
Weekly |
At longer intervals |
|
Check tension of belt. |
Check for leaks from behind pulley. Check belt for damage. Re-tension/change belt as required. Check pulley/shaft for play. |
Alternator belt, fan belt, drive belt
See Above
Engine coolant
On keel/tank and heat exchanger engines this should start as a 50% antifreeze/fresh water mixture.
It can be allowed to dilute down to 30%. Antifreeze inhibits internal corrosion and its the inhibitors that get "used up".
Depending upon the type of antifreeze used the coolant should be changed every two or five years.
Never top up right to the filler neck. Leave at least an inch of airspace to allow for expansion.
|
Day to day |
At longer intervals |
|
Check coolant level & top up if required. |
Check antifreeze strength. Change every two or five years. |
Wet exhaust system
It may seem odd to be revisiting the exhaust system in the cooling section, but if a wet exhaust system suffers a partial restriction or blockage overheating is likely to result.
The raw water pump uses an impeller with rubber "wings" on it and if it is asked to pump against too high a pressure the wings fold back so the pump keeps turning but pumps no water. The raw water ends up being pumped into the exhaust close to the engine so if anything prevents the exhaust gasses escaping from the system the pressure acting against the water increases. This first of all reduces the raw water flow and then prevents it completely. Unless completely blocked the problem normally occurs at higher engine speeds.
Keel/tank cooled boats will suffer no significant damage as long as the water flow is restored quickly, if the loss of water is ignored the exhaust hose will char and possibly catch fire inside. The smell and smoke usually alerts the less attentive!
Raw water and heat exchanger systems will start to overheat as the raw water flow is reduced.
The two main problems are the scaling up of the elbow where the water is injected into the exhaust system (like scale in a kettle) and the inside of the exhaust hose de-laminating when raw water is lost. The burnt inner lining then gets blown across the hose by the exhaust gasses.
Both these normally take years and years to develop so can normally be ignored, but they do cause persistent overheating which is hard to diagnose.
Internal anode
Some engines have a zinc anode fitted into the engine to help minimise internal corrosion. This needs checking annually and replacing as required. The engine will operate perfectly well without it in the medium term.
Thermostat
This is mounted in a housing, usually at the top of the engine where water leaves the engine and a large hose is connected. The hose is usually at least an 1¼ inches in diameter.
Thermostats very rarely cause problems except after the engine boils so there is little to do until symptoms show themselves.
If a thermostat stays shut or opens at too high a temperature then the engine will either boil or run hot.
When a thermostat jambs open the engine barely warms up and if you are using a calorifier the domestic water only gets warm, not hot.
Continuing major parts
Gearbox
The gearbox is mounted on the back of the engine and the propeller shaft is fitted to the other end.
As long as the gearbox has enough of the correct oil inside it there is very little else to worry about.
After many years of use two things may go wrong.
In extreme cases you may be unable to engage a gear although everything looks as if it is working correctly.
This indicates the part inside the "lump" on the engine called a drive plate has or is about to fail. Proper marine engines (Bukh, Penta MDx) may not have a drive plate.
Of course if the control cable becomes loose it may prevent correct gearbox operation.
|
Day to day |
At longer intervals |
|
Check gearbox oil level at least once a week.Visual inspect for oil leaks. Check the control cable for security. |
Change oil as per manual. Inspect drive plate (say 8 to 10 years). |
Engine controls
These will normally be the single lever (Morse) control with its two cables and an engine stop control.
Some engine stops use a pull cable and more modern ones are electric and use a button or ignition switch".
IMPORTANT – If you push a button or turn a key to a special stop position it is vital that you locate the mechanism that actually stops the engine so you can stop it if the electrics fail.
Get someone to operate the stop whilst you look and listen around the engine. You should be able to find the thing that stops the engine so you can work it if need be.
|
Day to day |
At longer intervals |
|
Assess degree of stiffness. Assess for excess free play etc.
|
Lubricate any "wire wound" stop cable. Check cables for security and fitting. Check "fittings" on the end of both cables for wear and lubricate. |
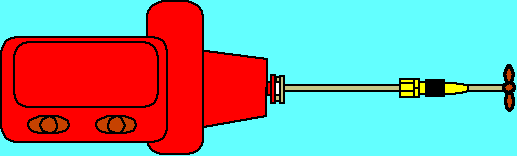
Propeller shaft and stern gland.
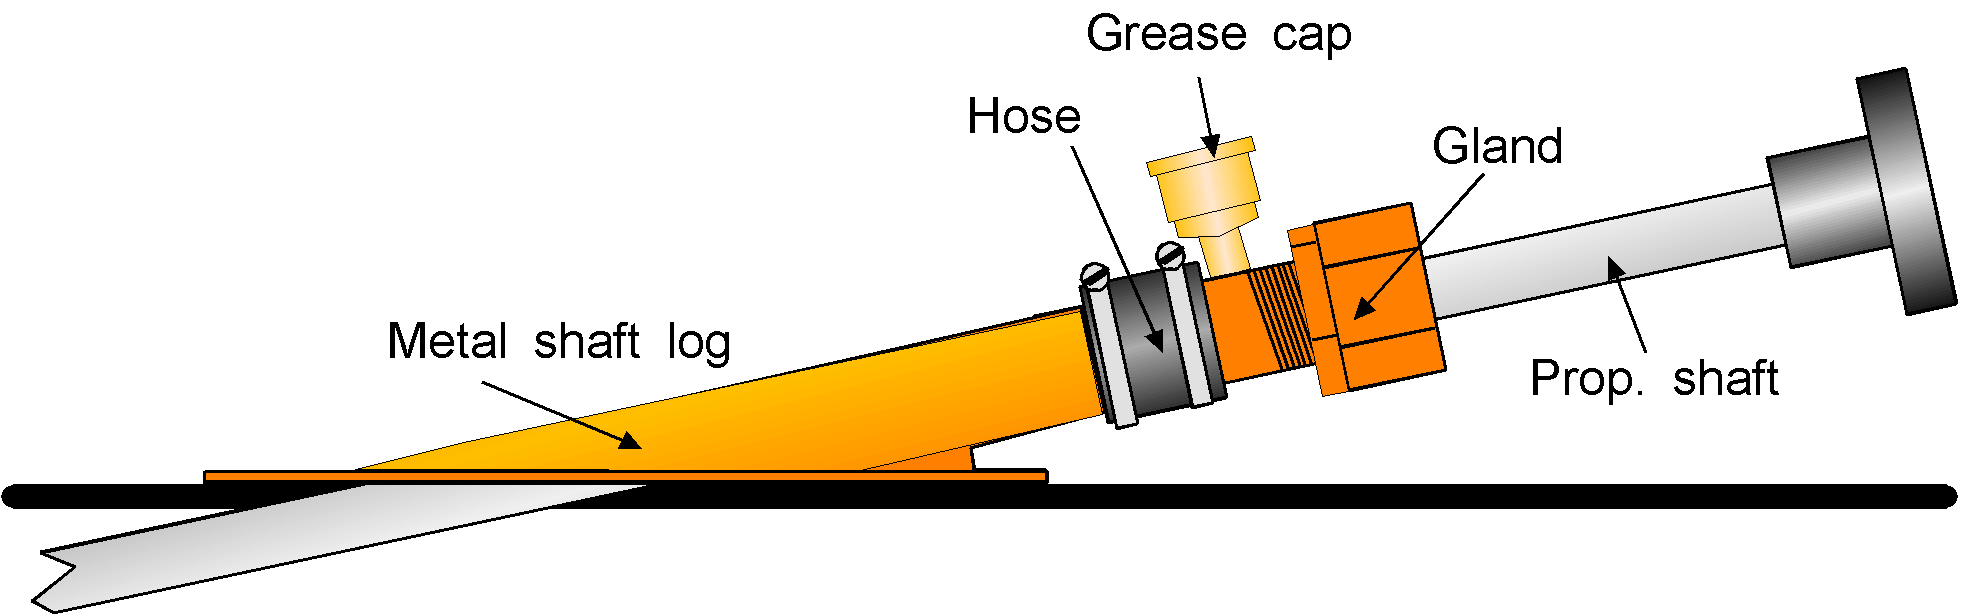
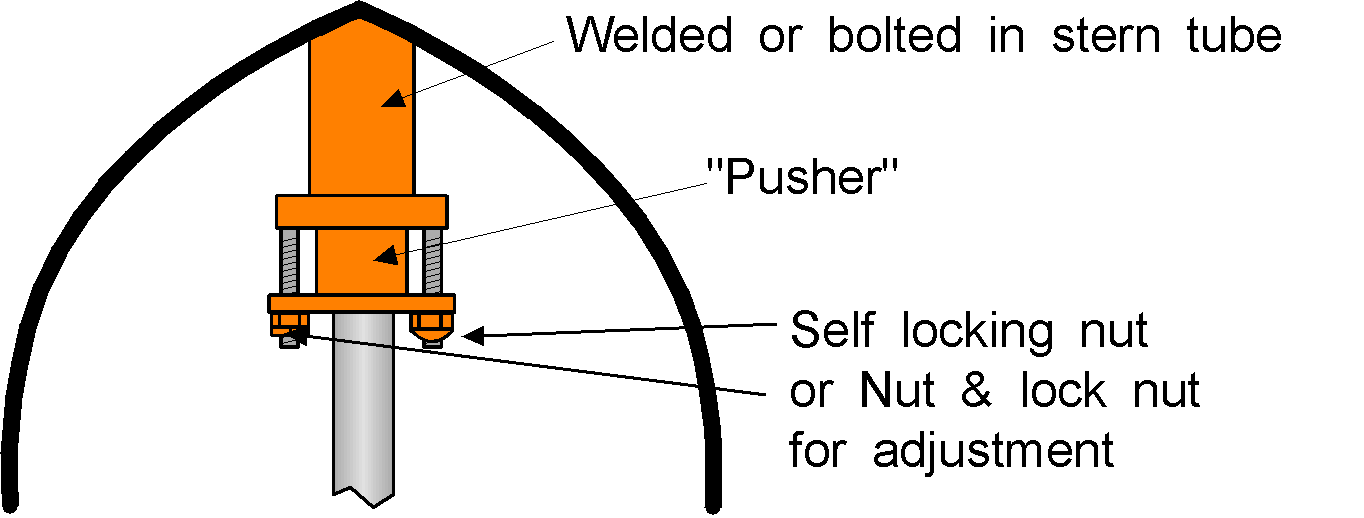
Two types of packed gland
There are many different types of stern gland but they fall into two main groups:-
Packed and Packless
Packless glands are typified by makes like Deep Sea Seal, Vetus, Volvo etc.
The gland may or may not be fitted with some form of greaser. Usually either a small screw down cap on top of the gland or a very much larger remote greaser.
Some glands are secured by a "rubber" hose. This is a critical component – if the hose fails the boat is likely to sink.
Packed glands will require adjusting at some time. They should drip once or twice a minute. When this becomes excessive they require adjusting. When the adjustment is all but "used up" the gland requires re-packing.
Any leak or drips from a packless gland is potentially very serious and professional advice should be taken.
Consult the manufacturer’s instructions for the service of packless glands.
The propeller shaft is very reliable so providing the coupling between the shaft and gearbox is secure and in good order you can all but ignore the shaft.
|
Day to day |
At longer intervals |
|
Turn down greaser. Refill greaser as required. Assess "drip rate" Check the hose if fitted |
Service packless glands. Adjust packed glands Repack gland Change hose as required (use correct type, diameter and length of hose). |
The Electrical System
As long as the boat has been reasonably maintained there is very little to do to the electrical system on a day to day basis apart from a few visual checks and ensuring the batteries are well charged. Even that is not so important for most diesels once they are running because they require no electricity to keep them going. Some of the modern ones do need electricity to allow fuel to flow, so those would stop if the battery went flat.
There are a number of different types of battery master switch and methods of making one alternator charge two sets of batteries, so if your boat has two battery banks it would be best to have the "Boating Partner" explain how your particular boat works.
The Battery Banks
If the boat is fitted with a voltmeter try to keep the batteries charged so an hour after the engine is turned off the meter reads at least 12.6 volts.
12.3 volts indicate that the bank is all but discharged and needs fairly urgent charging either ashore or by the engine.
Half an hour or so after starting the engine the charging voltage should be well above 13.8 volts. If it stays lower then your alternator is probably faulty OR you are using massive amounts of electricity.
If the boat has a big switch marked Bat1, Bat2, Both and OFF then turn it to Both as soon as the engine has started. This ensures both battery banks receive the best charge available.
NEVER TURN A MASTER SWITCH OFF WHEN THE ENGINE IS RUNNING
– if you do there is a good chance that you will damage the alternator. (Ignore this in the case of an electrical fire – turn the switch(es) off PDQ).Batteries come in two main types – those that you can top up with distilled or de-mineralised water and those that you can not. Apart from the need to top up the first type at long intervals both types can be treated in a similar manner. If one filler (cell) on a battery needs frequent topping up the battery is probably starting to fail. If they all do then there may be a charging fault or the battery is failing.
When most battery types get close to the end of their life the case swells, the more the ends have bowed the shorter the remaining life.
|
Day to day |
At longer intervals |
|
Keep an eye on the battery voltage if possible. Ensure you run for long enough to recharge the batteries. |
Check cables and terminals are secure & clean Clean top of all batteries. Clean terminals and refit with lots of Vaseline. Top up (if battery type allows). Inspect battery case for "bowing" Ensure batteries are stored as fully charged as possible. |
The Alternator
The only thing that occasionally happens on a badly maintained boat is the drive belt becomes loose or snaps so a quick look each morning is all that is required.
The "ignition" or battery warning lamp plays a vital part in this system, so if it stays on after you have given the engine a bit of a rev you are probably not charging the battery for some reason. This usually indicates a faulty alternator but it may be faulty wiring.
If it refuses to come on when you turn the ignition you again need to seek advice before the batteries go flat. This may be a blown bulb (in which case revving the engine to maximum for a moment may make the alternator charge) or a faulty alternator.
|
Day to day |
At longer intervals |
|
Look at drive belt before starting. Keep an eye on the warning lamp. |
Adjust belt tension. Renew belt when required. Check cables are secure and terminals tight and clean. |
The starter motor
As long as you do not flood them with bilge water the starter motor usually lasts for a very long time.
|
Day to day |
At longer intervals |
|
No tasks |
Check it is securely mounted Check cables are secure and terminals tight and clean. |
Fault finding
If you have a well-maintained boat and carry out the day to day tasks it will be many weeks or months before you get a problem that needs professional help.
The most likely system to give you problems will be any cooling system that involves raw water but reacting fast to the exhaust noise will minimise any chance of it developing into something you can not cope with.
Please note that this section is NOT intended to give complete fault finding procedures. It IS intended to allow the less mechanically minded get their boat to help or safety. More complete faultfinding instructions are available in other TB-training materials.
Engine will not stop.
Lift engine covers and sniff. Can you smell anything like petrol, paint, thinners or bottle gas?
YES* - turn fuel tap off if you can do it without getting close to the engine and go to far end of boat or evacuate – a very very rare occurrence – possibly radio for help.
NO – Does it have a mechanical stop mechanism on the injector pump?
Yes – Use it to stop engine (tie string to it for future stops).
No – Turn fuel off and wait. You will probably have to bleed the system to restart.
- This is known as a runaway engine and parts may fly out of it and hole a grp or wooden hull. A CO2 fire extinguisher directed into the air inlet might stop it as may a large pad of rag held over the air inlet. Whatever you do keep your limbs above the engine in case you get hit by flying debris.
Engine will not start
Compare the speed the starter turns the engine over with previous starts.
A Change multi-position switch to other battery bank or fit jump leads between domestic batteries and start battery. Does it now start?Slower –
Yes – Battery flat – get it charged or run engine for a long time.
No – Check the terminals on the two thick wires. Are they clean and tight?
No – Clean, tighten and try starting. Does it now start?
Yes - Problem solved
No - Seek help.
Yes - Seek help.
About the same speed – Is the exhaust producing a fair bit of whiteish smoke?
A above.Yes – You have fuel so it should start – go to
No – Is the stop control stuck in the stop position?
Yes - Push control back and start.
No – Do you have at least 4 inches of fuel in the tank?
No – Fill tank, bleed system if required & start engine.
Yes - is the fuel tap turned off?
Yes – Turn on, bleed system & start engine.
No – Seek help.
Will not engage or slow to engage a gear
Check gearbox oil level and top up if required. Can you now get the gears?
Yes – Check for leaks and problem solved.
No – Is the control cable moving the lever on the gearbox?
No - Move gearbox lever by hand. Does it now go into gear?
Yes – Problem found – tie cord to lever so you can operate it and take boat to seek help.
No – Probable gearbox or drive plate fault – seek help
Engine loses power
Look at prop-wash from back of boat, is it normal or "lumpy"
Lumpy – Fouled or damaged propeller - physically check if possible or seek help.
Normal – Has the exhaust smoke gone blackish?
No – Probably a lack of fuel for some reason – running out of fuel, tap turned off, blocked fuel filter, stop control half on and half off.
Yes – Open engine covers to allow free flow or air into engine. Does the engine speed up?
Yes – Blocked air vents into engine compartment.
No – Is the air cleaner dirty or has any air ducting collapsed?
Yes – Rectify and restart.
No – Something is probably seizing up, proceed at low speed to get help.
Excess engine vibration
Look at prop-wash from back of boat, is it normal or "lumpy"
Lumpy – Fouled or damaged propeller - physically check if possible or seek help.
Normal – Inspect the engine mounts and brackets between the engine and mounts. Is there any looseness, mount collapse or broken bracket.
Yes - Nurse boat at low speed to get help. Keep a close eye on the stern gland.
No – Inspect running propeller shaft. Is it waving about?
Yes – Damaged flexible gearbox coupling or bent shaft. Nurse boat at low speed to get help. Keep a close eye on the stern gland.
No – Inspect all drive belts. Is one shedding material or has bits hanging out of it?
No - Nurse boat at low speed to get help. Keep a close eye on the stern gland.
Yes – Change belt if you have one or nurse boat at low speed to get help. Keep a close eye on the stern gland.
Oil light comes on as engine slows.
If an oil gauge is fitted does it show at least 20 psi on idle?
Yes - Probably a faulty sender unit. Continue motoring but keep listening in case engines starts making knocking noises. If so see below.
No – Check oil level – is it between maximum and minimum?
No – Top up and retry. Check for leaks.
Yes – Feel and smell the oil – is it thin and smelling of diesel?
Yes – Internal fuel leak into oil – change oil if possible, otherwise use sump pump to keep oil level at minimum. Move boat to obtain help, avoid high speeds.
No – Potentially expensive internal fault. Ideally stop at once and get help. If not possible proceed to nearest safety at low speed.
Smell of burning rubber
Dry exhaust boat:
Inspect and feel all drive belts and their pulleys. Are any warm or hot?
No – Probably from external sources. Keep an eye on the boats wiring in case its an electrical fault.
Yes – Slipping belt. Adjust tension or replace.
Wet exhaust boat:
Is there the normal amount of water coming from the exhaust?
Yes – Go to dry exhaust procedure above.
No – Check sea cock is still turned on, ensure nothing is blocking the sea-inlet skin fitting, ensure strainer is clear. Restart engine. Is there the normal amount of water coming from the exhaust?
Yes - Problem solved
No – Check raw water pump, change impeller if required. Restart. Is there the normal amount of water coming from the exhaust?
Yes – Problem solved.
No - Some form of blockage. Nurse boat to closest place of safety & get help.
Engine overheating (dry exhaust).
Is the engine water pump drive belt correctly tensioned and in place?
No – Re-tension or replace. Allow engine to cool and top up as required. Run engine.
Yes – Allow engine to cool then top up, bleeding air from any bleed points. Run engine and check for leaks. Any leaks found?
No – continue, but keep an eye on temperature.
Yes – Rectify leaks and continue. If leaks can not be rectified take boat to get help with pressure cap removed whilst maintaining coolant level. Proceed at low speed and power.
Engine overheating (Wet exhaust).
Is there the normal amount of water coming from the exhaust?
Yes – Go to X below
No – Check sea cock is still turned on, ensure nothing is blocking the sea-inlet skin fitting, ensure strainer is clear. Restart engine. Is there the normal amount of water coming from the exhaust?
Yes - Go to X below
No – Check raw water pump, change impeller if required. Restart. Is there the normal amount of water coming from the exhaust?
Yes – Go to X below
No - Some form of blockage. Nurse boat to closest place of safety & get help.
(X) Is the engine water pump drive belt correctly tensioned and in place?
No – Re-tension or replace. Allow engine to cool and top up as required. Run engine.
Yes – Allow engine to cool then top up, bleeding air from any bleed points. Run engine and check for leaks. Any leaks found?
No – continue, but keep an eye on temperature.
Yes – Rectify leaks and continue. If leaks can not be rectified take boat to gethelp with pressure cap removed whilst maintaining coolant level. Proceed at low speed and power.
|
|
|
Home |