| Back | Home | Index | On |
INTRODUCTION
Aim of the course
This course is designed to give prospective and current boat owners the knowledge and experience they need to:-
within the low voltage circuits of their boats (12/24 volt)
A blend of theory and practical work will be used in reaching the individuals’ learning goals.
It is expected that group discussion and dynamics will enhance everyone’s experience of the course.
We attempt to teach as much as we can in a limited time, however your lecturer is always happy to try and accommodate individual needs within the course.
The well-defined course plan will not always be met in full, and will be modified to meet specific group needs.
We will treat 24 volt systems as being the same as 12 volt ones, but simply running at a higher voltage with less current flowing
Your lecturer apologises to those who recognise the liberties that will be taken with terminology to help understanding
Apart from standard hand tools we will be using a number of simple specialist tools:-
Whenever possible either disconnect the battery or turn off the master switch before undertaking any electrical work.
Take great care when working near batteries:-
- They give off hydrogen whilst in use (oxygen as well), so the smallest spark can cause them to explode.
- Ventilate batteries and blow across the top before connecting meters or disconnecting them.
- Always turn all loads and any charger OFF before connecting or disconnecting batteries.
Always site a battery in the coolest area possible that is well ventilated, away from sparks & flames, and is easy to get at.
Avoid using an ordinary ammeter unless you know what you are doing.
- If connected wrongly they can burn themselves out.
- If connected wrongly they can set fire to wiring or blow fuses.
- If you drop an ammeter cable it can cause a fire or burn out the meter.
Never try to work on mains electricity unless you are really sure what you are doing.
- It can kill you if it can get to you.
- If incorrectly installed it can kill people stepping on or off the boat – especially on steel boats.
- If incorrectly installed can cause submerged metal parts of the boat to corrode
- If incorrectly installed it can make the whole 12/24v system run at 220 volts. This is likely to electrocute you or your guests.
- You may well be held legally liable for any injuries or death due to incorrectly installed 220 volt systems.
Always think and double check before you act.
Remove all watches, rings etc before working on electrics.
Types of electricity
There are two types of electricity:-
- Alternating Current - usually referred to as AC
- Direct Current – usually referred to as DC
AC electricity keeps reversing the direction it is flowing down the wire. The UK mains do this 50 times a second
We also get AC electricity in the alternators, but as this is changed to DC before it gets out of the machine we will ignore this.
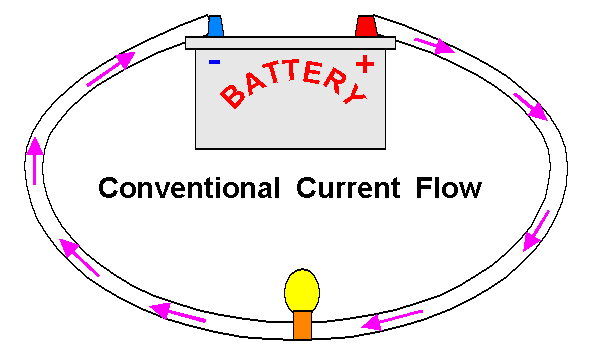
DC current flows in only one direction. This is what our 12 or 24 volt circuits do.
There are two ways of looking at DC current flow, but engineers traditionally say it flows from positive to negative.
This is called CONVENTIONAL FLOW, and it’s the way we will think about it during the course.
ELECTRICAL UNITS
There are just two basic units related to electricity that we need to understand:-
One unit related to the wire, connectors, and electrical equipment:-
One unit derived from 1 & 2, that we only need concern ourselves with so we can calculate current (2):-
One unit we need to work out how much electricity we need to store in our
batteries or to generate:-
We will deal with amp-hours when we get to the battery section, and power when we get to calculating cable sizes.
CURRENT
Electricity is actually made up of millions of microscopic dots, each able to move through pieces of wire. The dots are known as electrons, but your lecturer pictures them as little wrinkly, dark brown, things - "electric currents" ;-) – in a Smartie tube – the wire.
If we could drill a hole in the wire so we could watch and count the number of "electric currents" flowing past the wire we would end up with an extremely large number, but we would have measured the amount of current flowing.

VOLTAGEThe unit of current is usually known as the AMP and it is often abbreviated to I (don’t ask why) or A.
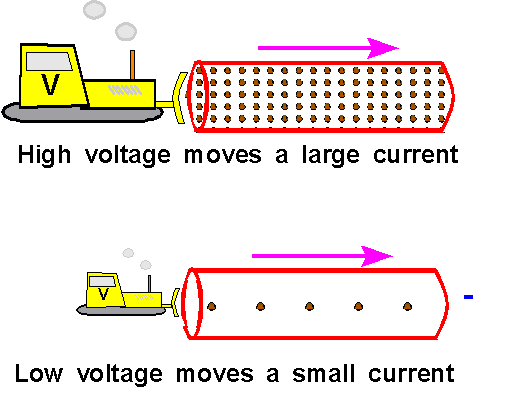
Something has to make those millions of electric "currents" flow through the wire – they need a good push. This push or electrical pressure is known as the VOLTAGE.
The size of push does not make the electricity flow any faster – it just shifts more of it.
The voltage is measured in Volts and volts are abbreviated to E or V.
The insulation on cables has to stop the pressure (voltage) pushing the electric "currents" out through the sides of the cable. This means that high voltages need thick insulation and low voltages only need thin.
There are three "sorts" of voltage:
EMF – Electro Motive Force – The voltage that appears to be in a battery when there is nothing turned on.
This is a nuisance because it lulls us into thinking our batteries are well charged, when they are not. Apart from batteries just ignore emf
PD – Potential Difference – This is what everyone normally calls voltage, it’s the pressure pushing current around a working circuit.
VD – Volt Drop – This is the voltage that finds it easier to push through a meter than to go where it is supposed to go – usually because something is loose, burnt, or broken.
As far as we are concerned at the moment voltage is pressure that pushes current through wires.
It is the voltage that gets "used up" when current does any work. This could be good work, like lighting a bulb or running a motor, or bad work like pushing current through a loose connector. We will use voltage drop to find faults in high current circuits that would otherwise need very large and expensive ammeters – but that’s much later.
Volt-drop is caused by:-
Cable too thin
Loose connections
Dirty connections
Excess current flow
(this is really the other side of the three above, but it needs to be remembered – if the cable size is correct, but you are getting volt-drop then something must be drawing too much current)
If you need to read this section, I would advise that you need two meters for fault finding:
A digital multimeter costing between £20 and £30
Something known as a DC Clammeter or DC Induction Ammeter costing about £20. (Vehicle Wiring Products)
A multimeter will be able to measure amps, but not enough of them for a lot of the engine electrical fault finding. Also, unless you are practised and know what you are doing, it is too easy to damage components, the meter, or cause a fire. A clammeter simply clips to a piece of cable and gives some sort of indication of curent flow. It is very hard to do damage with a clammeter – it’s easy with an ammeter! Take care because some clammeters only measure AC.
A mulitimeter is a complicated looking thing.
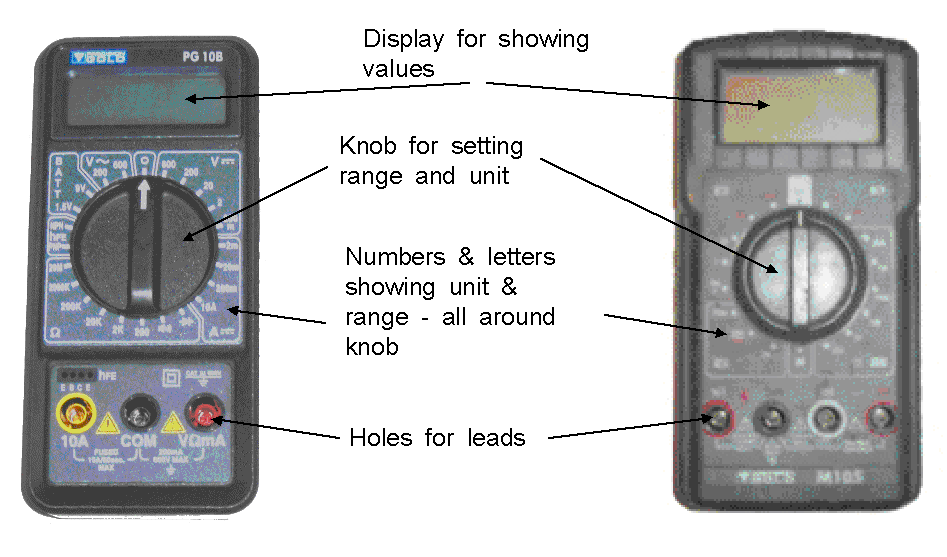
Obviously each meter is a little different, and they do look complicated, but if you study the diagram below, you will see that we can ignore most of the ranges and simplify the whole business.
Other meters will look different, but just find the important units, ranges and sockets.
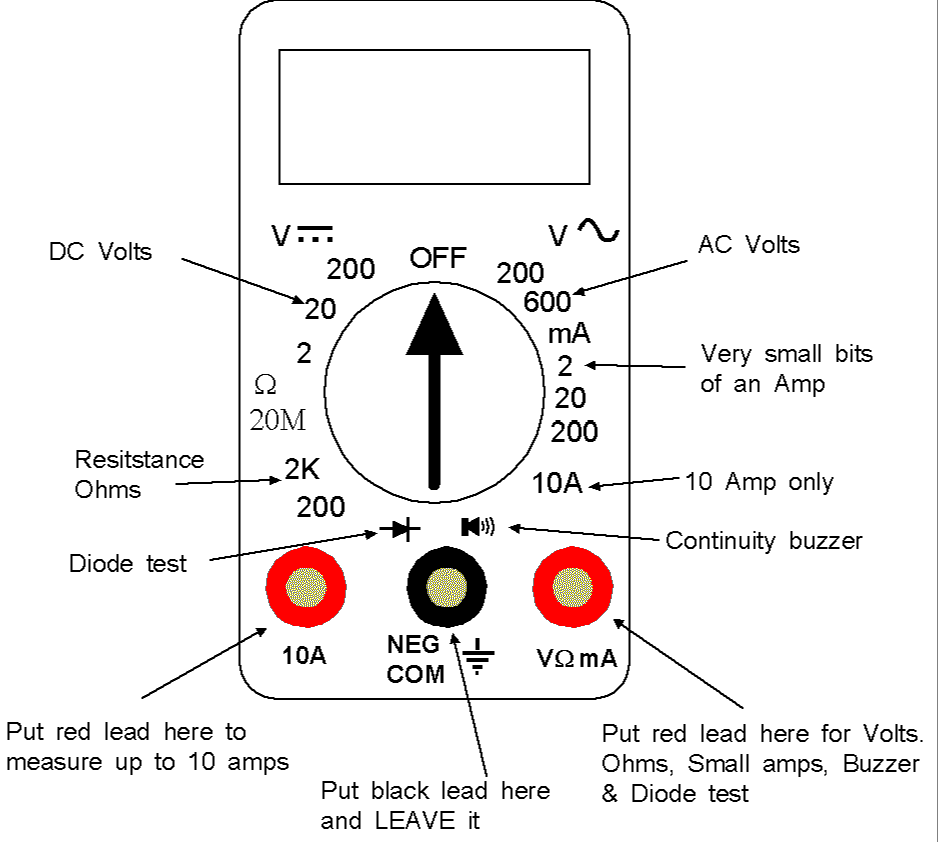
MAKE SURE YOU DO NOT SELECT AC FOR BOAT SYSTEM WORK – IF YOU DO YOU WILL GET A FALSE READING
Do not get involved in measuring mains unless you know what you are doing – one slip and it could kill you!!!!
Reading the VoltmeterCheck you have selected the DC voltage range (not AC).
Select the 20V or 200V setting as required.
Connect the meter between battery negative (long cable if required), and the point you are trying to test.
Check and record the battery voltage first – with the load switched on.
Its usually best to do the test with the load switched ON, that way any loose connection etc will show up as a loss of voltage.
Before taking an ohmmeter reading join the two leads together, very firmly, you should get a zero on the meter – its rarely like that. Expect up to 3 ohms, but whatever it reads, deduct this from your final reading.
If an "I" appears on the left hand end of the screen it shows that electricity cannot get through whatever you are testing. For all normal marine work this can be considered as a broken wire, also known as an OPEN CIRCUIT.
If numbers appear, they give the resistance of what you are measuring in Ohms. Exactly what reading to expect depends upon what you are measuring. Some readings are given in each section.